LMS Quizzes
The LMS Quizzes menu provides you with the tools to create a quiz, assign it to your students, and check their results. The menu is accessible to everyone in your subdomain. However, there are differences in terms of what each account can view:
- Organization accounts, Administrators, and Tutors have access to all submenus in the Quizzes category. They can create, review, and complete quizzes assigned to them.
- Students only have access to the Results menu, where they can see their quiz results and take quizzes assigned to them.
QUIZZES MENU OVERVIEW
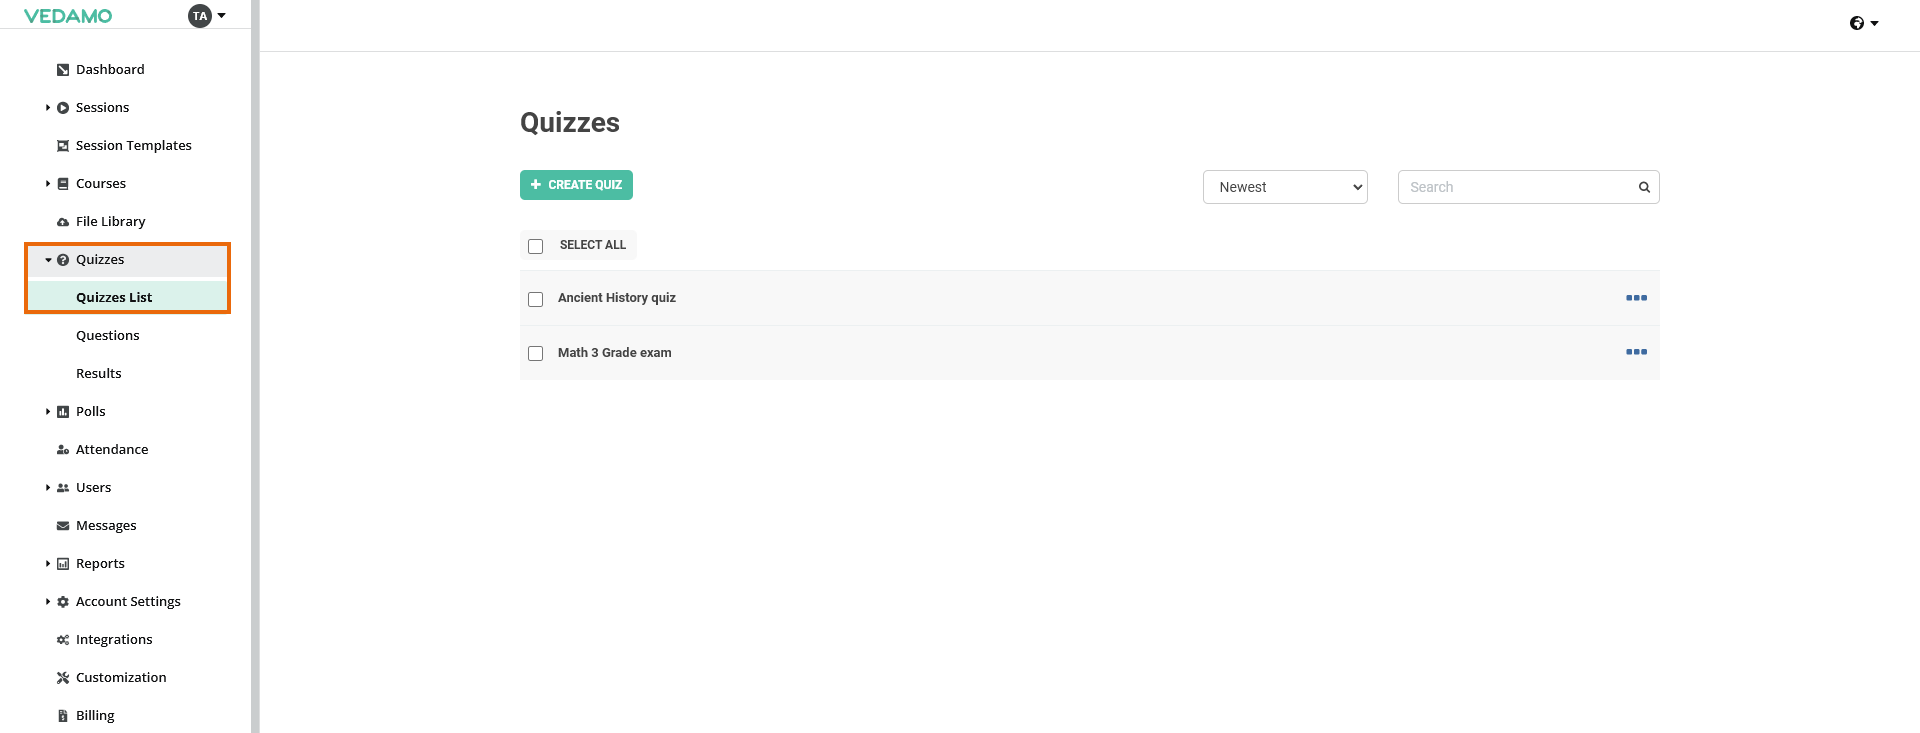
Log in with the Organization account in your subdomain to see the Quizzes menu on the left side.
Click on Quizzes to see all the quizzes you have already created.
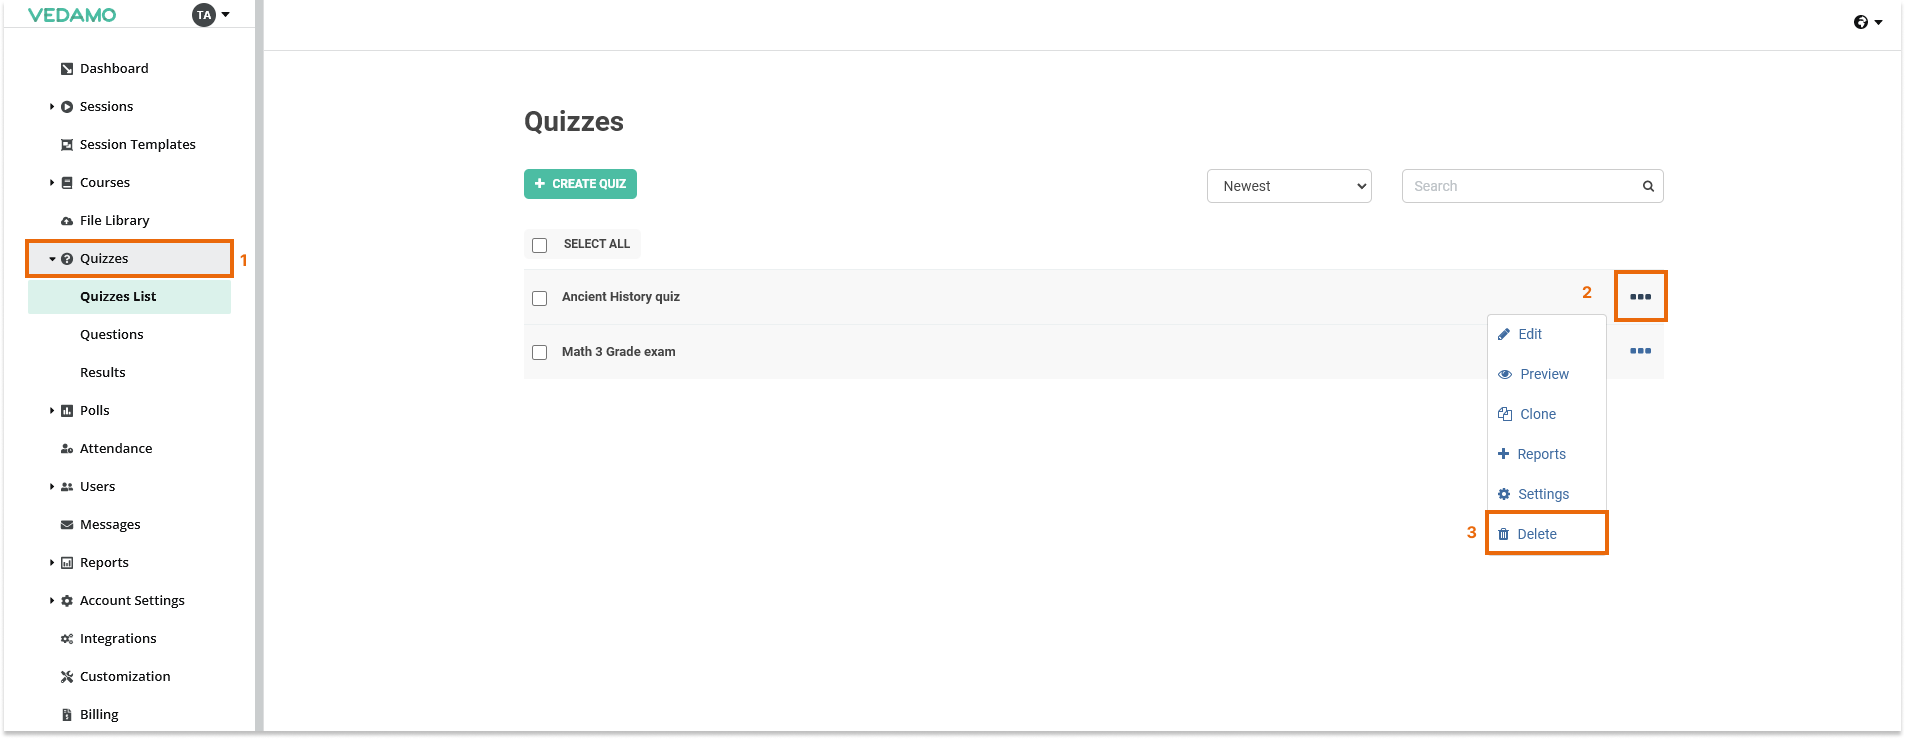
To delete a quiz, select it, press the threedots button and then click Delete.
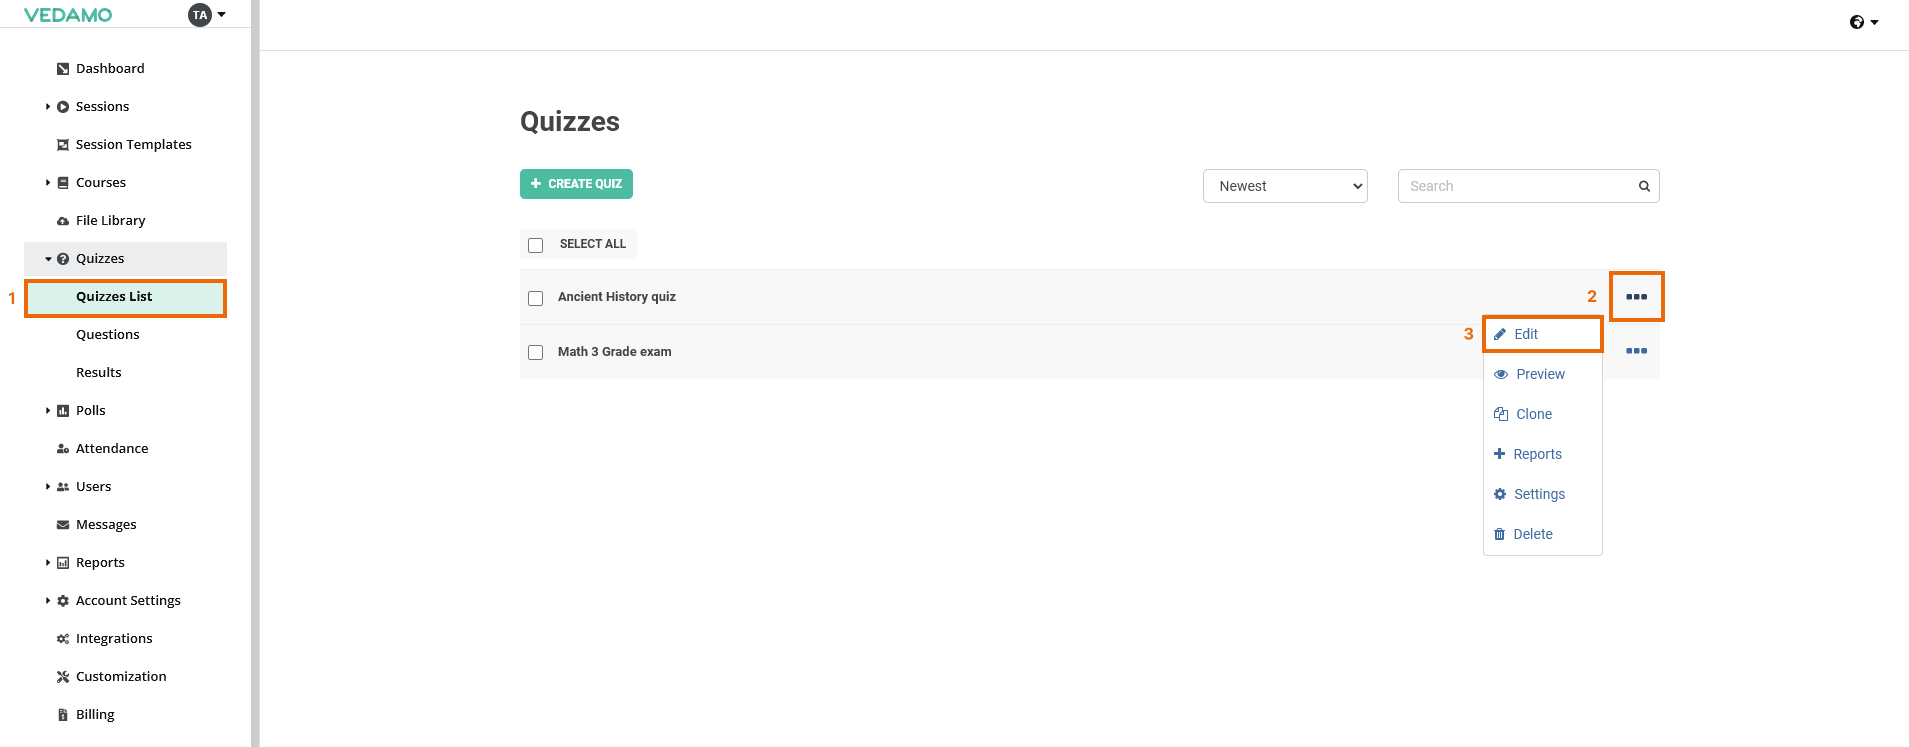
To edit a quiz, click on the three dots on the right. There are also some additional options: to preview, clone, to see the results of the students, or adjust the settings.
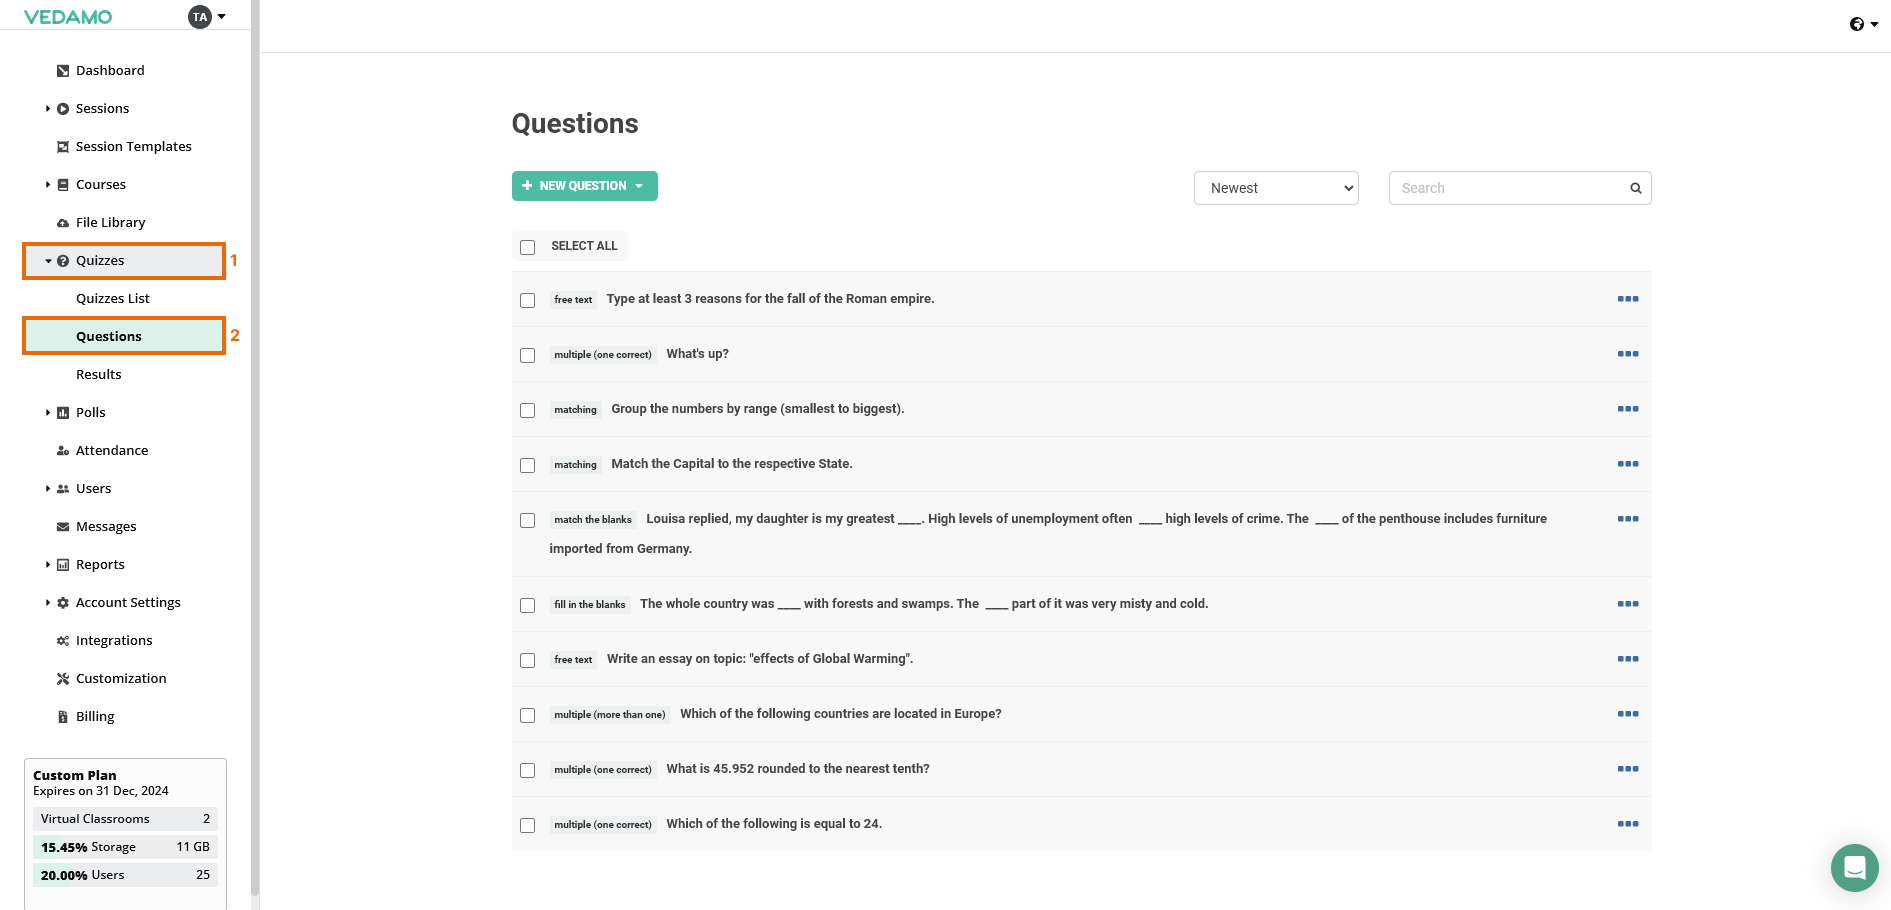
Click on Questions (in the Quizzes menu on the left) to see all the questions that have been created in your organization. You can create questions by clicking on the green + NEW QUESTION button.
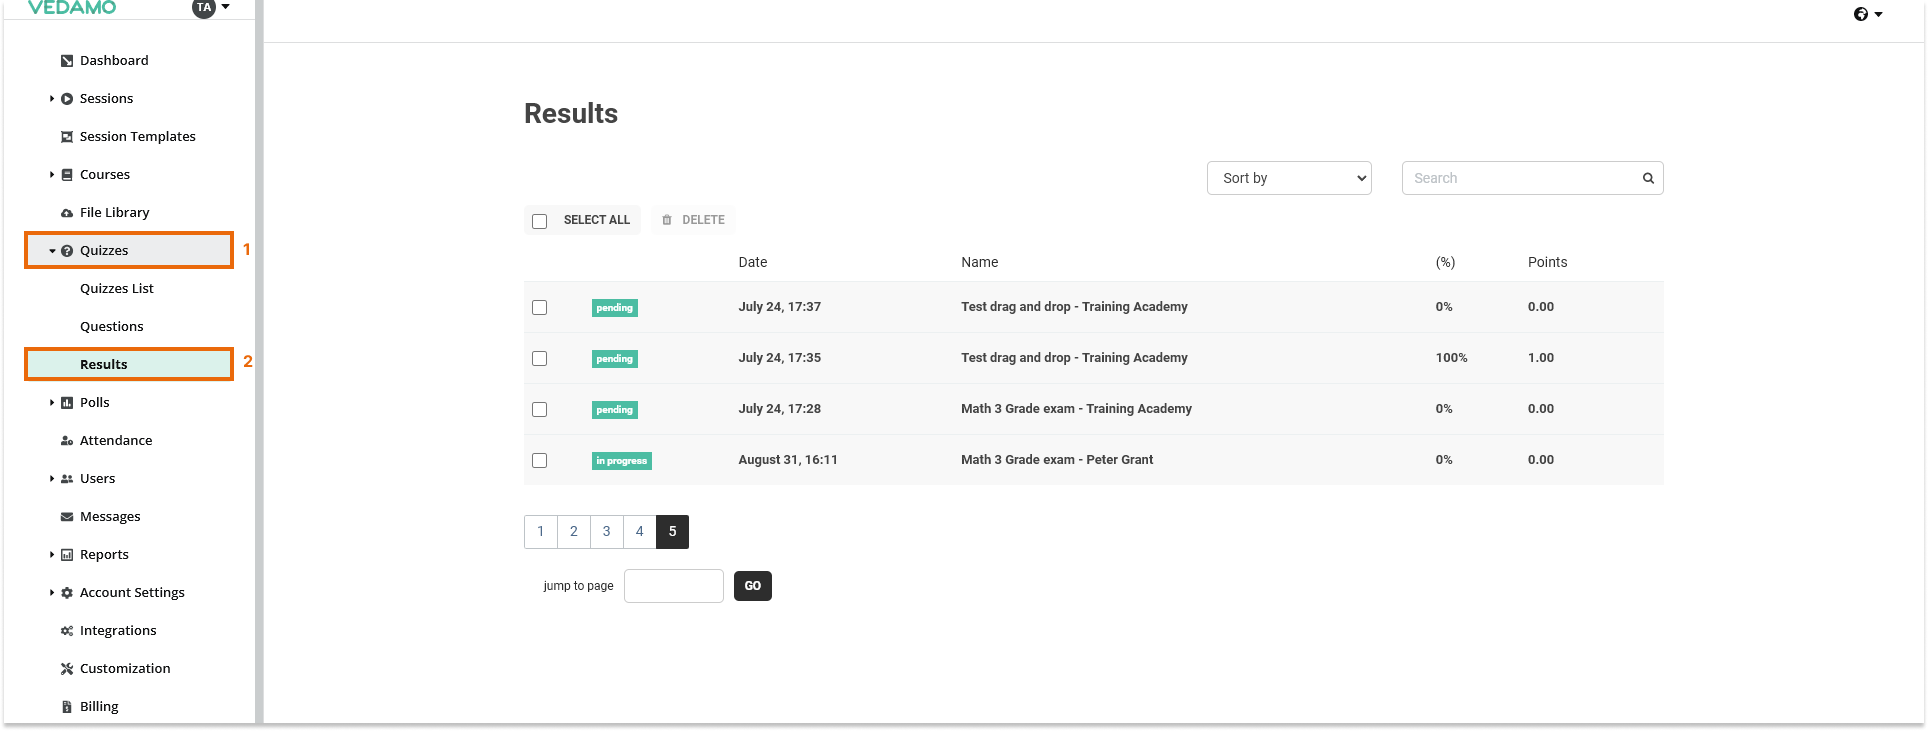
Click on Results (in the Quizzes menu on the left) to see the students’ answers that are pending, or the teacher has already reviewed them.
HOW TO CREATE A QUIZ
To create a new quiz, select the Quizzes tab and click on the green +Create Quiz button. On the next screen you can fill in a title for your quiz. You can also add a description of the quiz, but this is optional. You can add image/table into the description for additional content when creating the quiz.
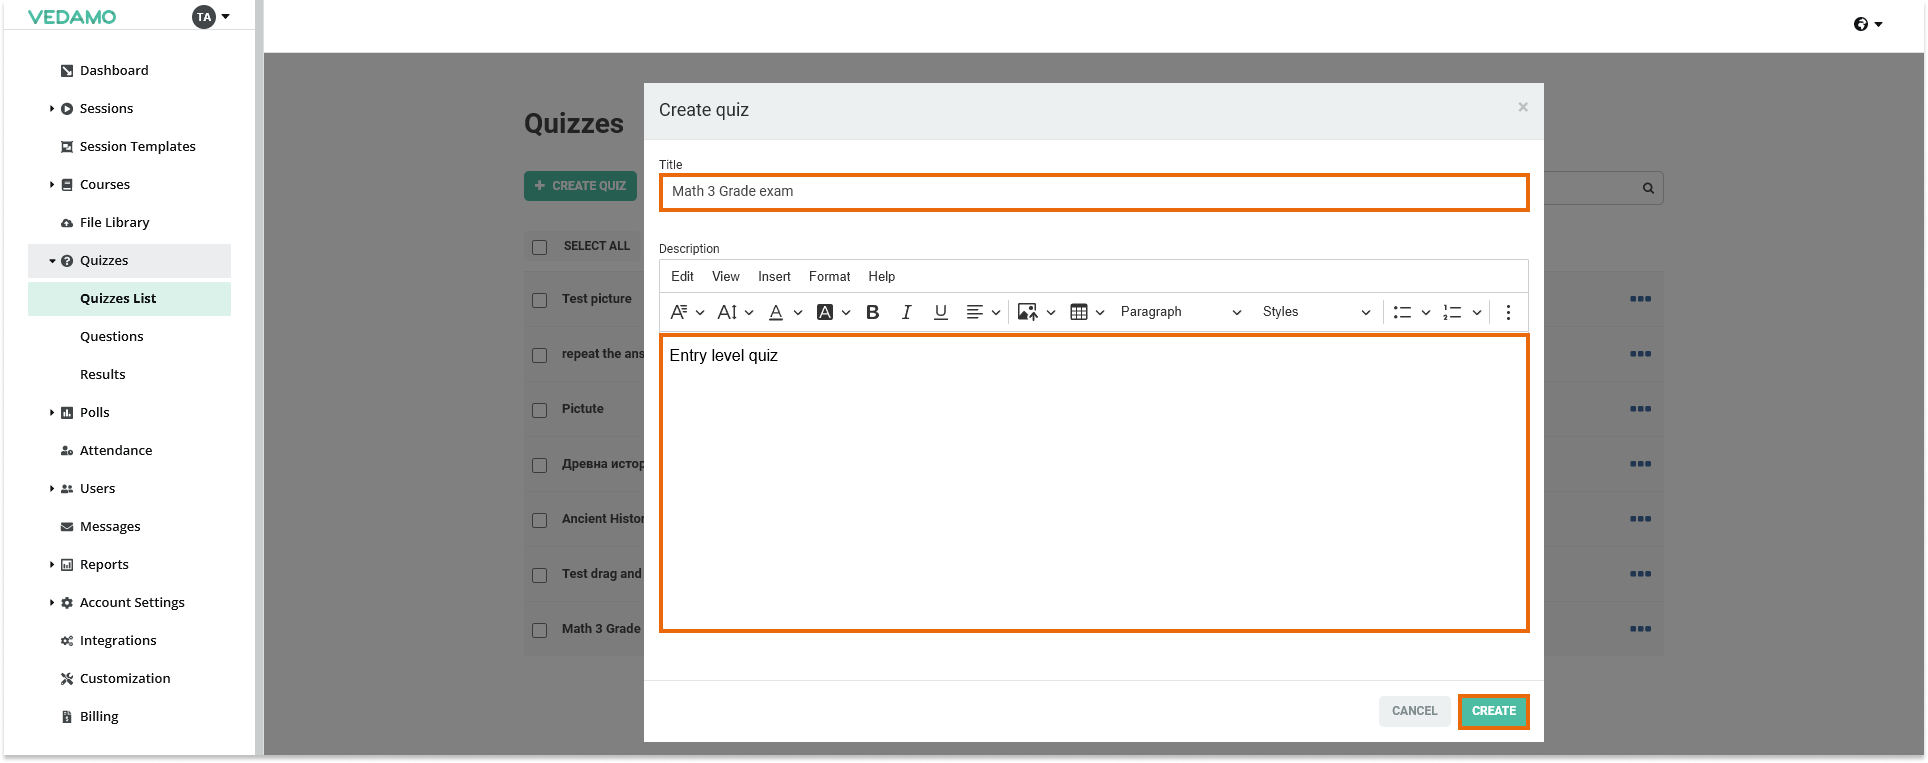
When you have finished filling in the necessary information, click on Create.
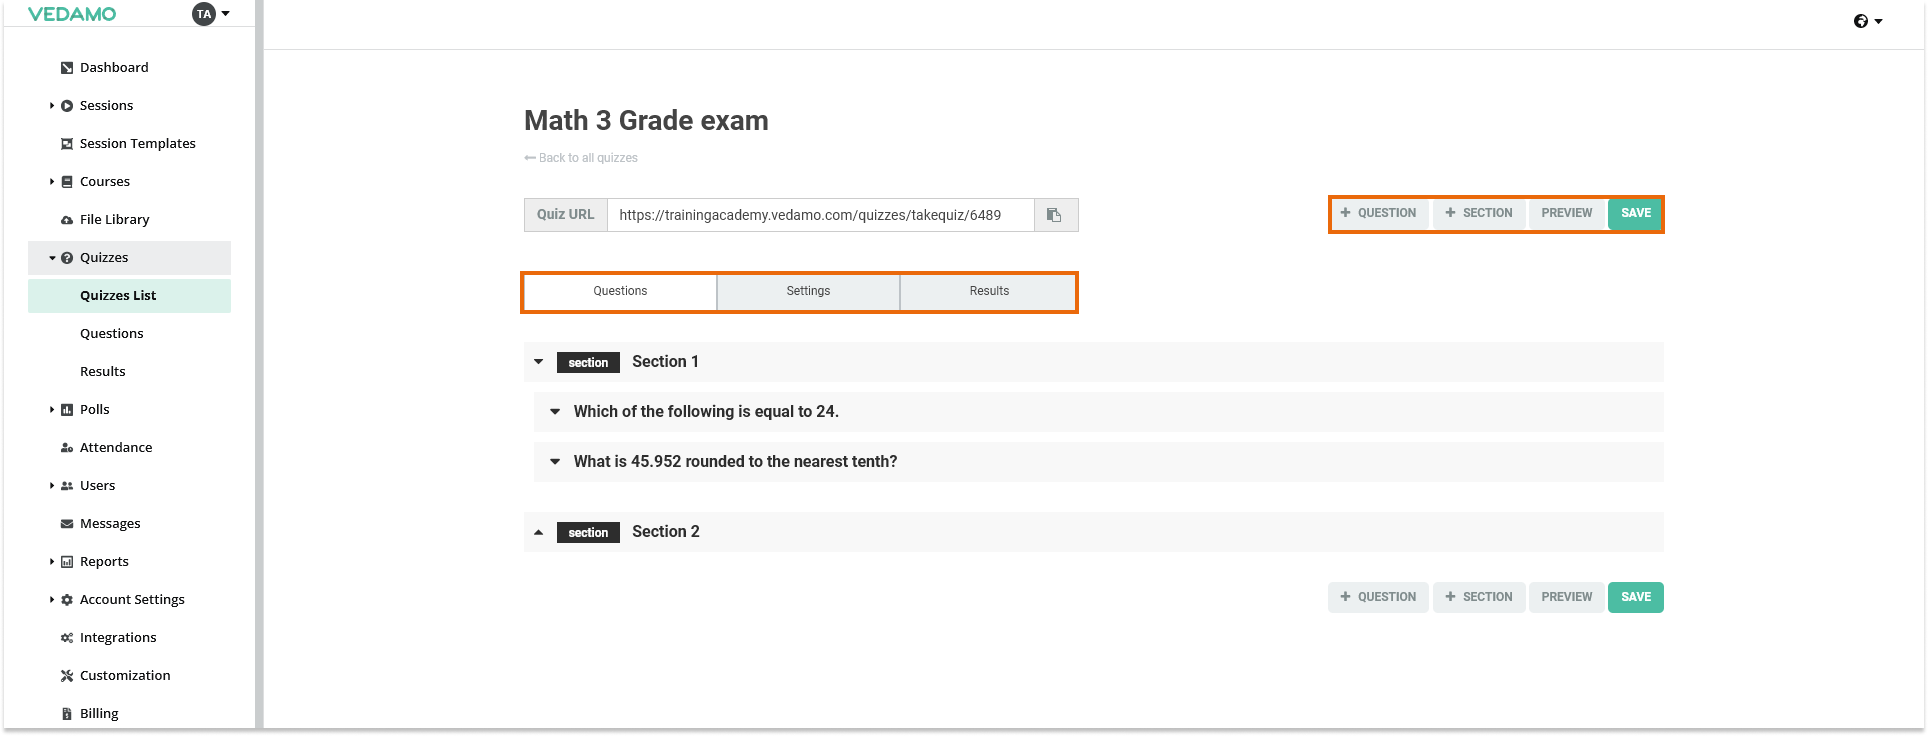
There are additional options and tabs on the final screen of the Quiz Creation process.
Here is a list of these options with an explanation of each of them:
- + Question: This allows you to add new questions to the quiz.
- + Section: This lets you add new sections to the quiz.
Note: Each quiz has a Default Section attached to it and by default, every question that is added to the quiz is included in the Default Section.
- Preview: This allows you to preview the newly created quiz.
- Save: This allows you to save all the changes to the quiz.
- Quiz URL: This is the quiz URL that you can use to share the quiz with your students.
QUIZ SECTIONS
To add a new section to the quiz, click on + Section. You can add a title and a description to the section – both are optional.
Then, you have the following options to select from:
- Questions in the section are mandatory – mark all questions in the section as mandatory.
- Shuffle questions – shuffle the questions so they appear in a different order for each student.
- Shuffle answers – shuffle the answers so they appear in a different order for each student.
- Use certain amount of questions randomly – select the total number of questions to be used in the quiz.
- Don’t show the title and description of the section – hide the title and description of the section when a quiz is being taken by a student.
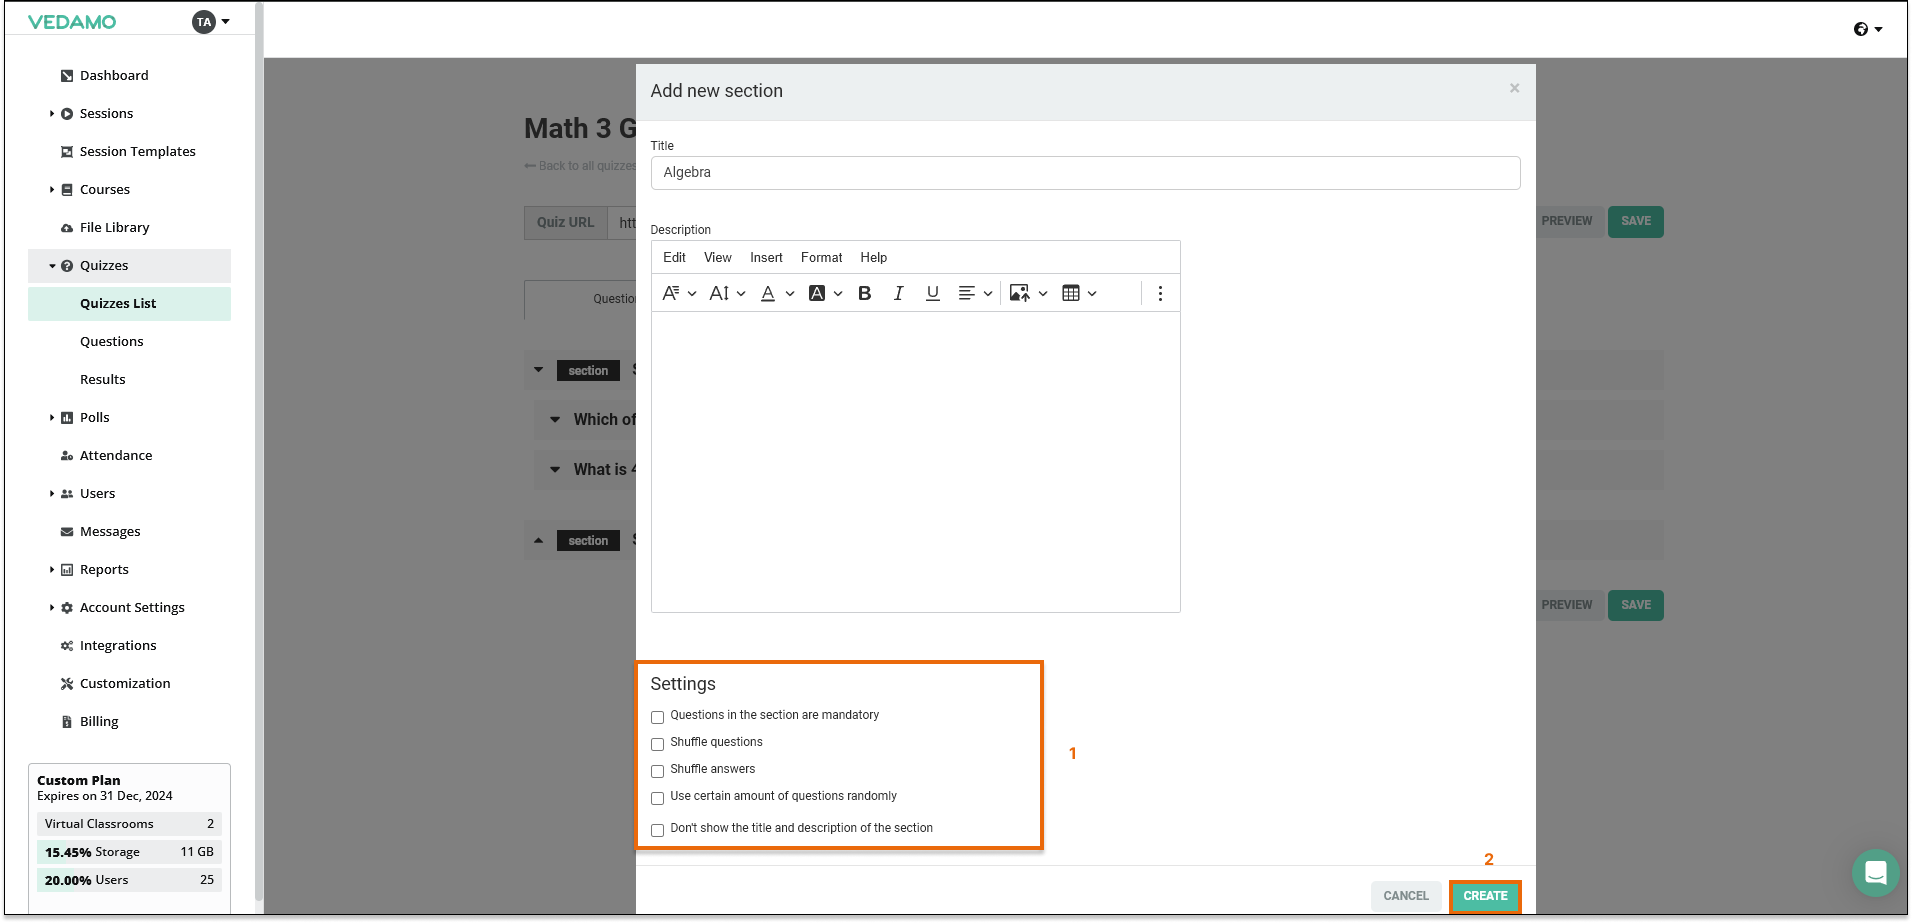
The title, description, and settings for each Section in a quiz can be edited (including the default section). To do so, click on the three dots icon (you will need to hover over the whole row) and then select Edit.

QUIZ QUESTIONS
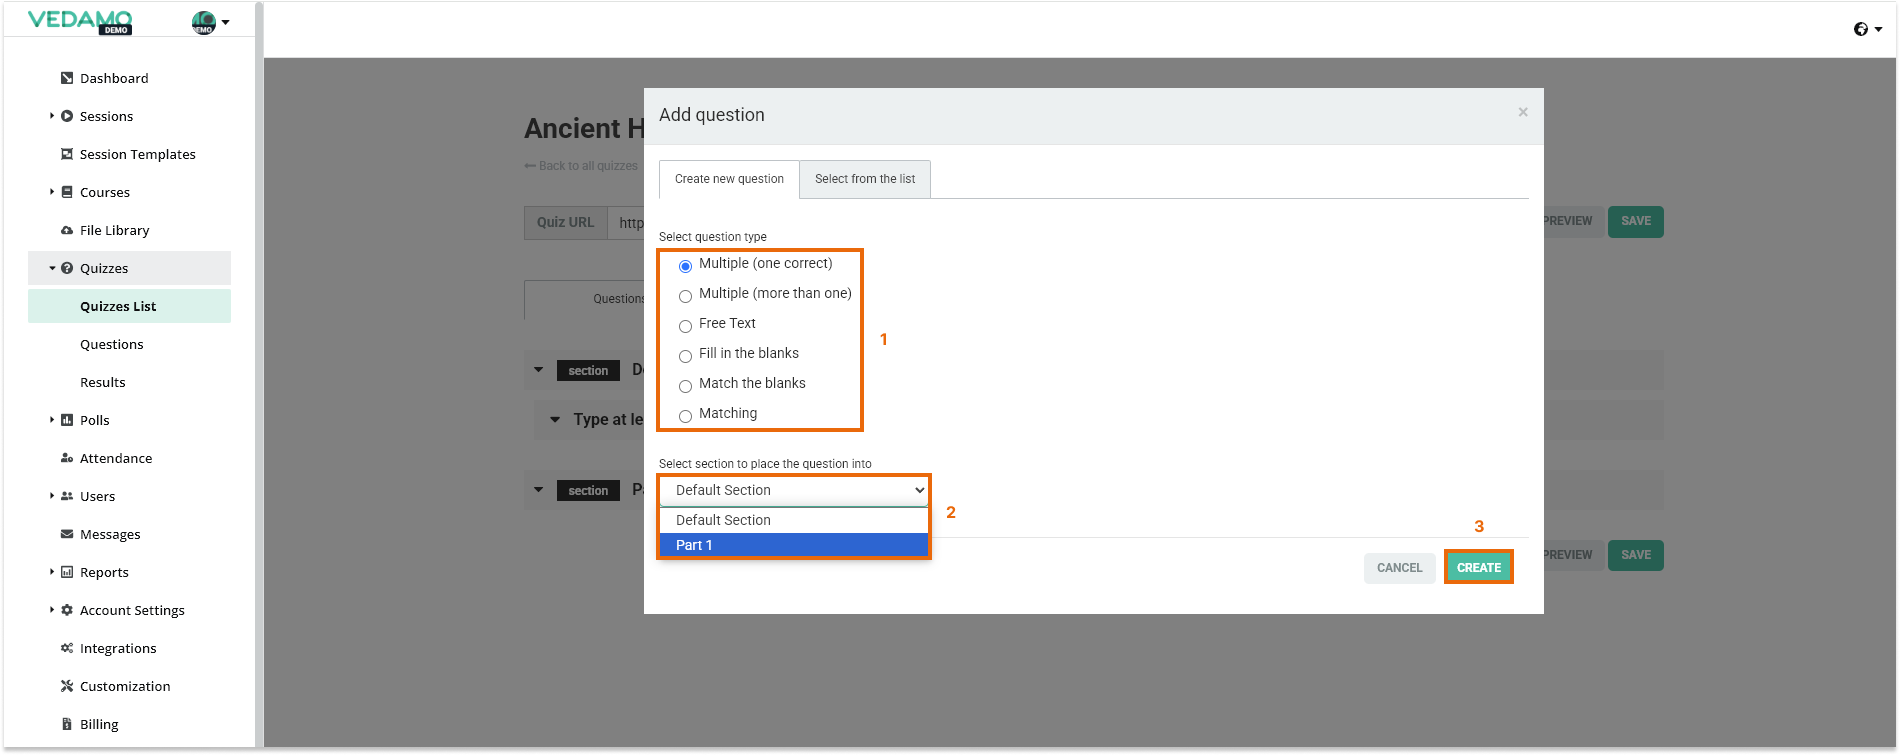
To add questions to the sections, click on + Question. First, you have the option to create a new question or to choose from the list of all the questions that have been created in your organization.
To create a new question, select the type of question you would like to add.
Then, select the section into which you would like to place it. You may add as many answers as you want. Also you can add images in the creation of the question for further information.
Finally, click on Create.
TYPES OF QUESTIONS
There are six different types of questions:
- Multiple-choice questions with only one correct answer
- Multiple-choice questions with more than one correct answer
- Free-text questions (for essays and different written assignments)
- Fill-in-the-blanks questions where the students provide the missing word or words
- Match-the-blanks questions where the students match different terms and words
- Matching questions where the students’ pair items in one column to items in another column
Multiple (one correct)
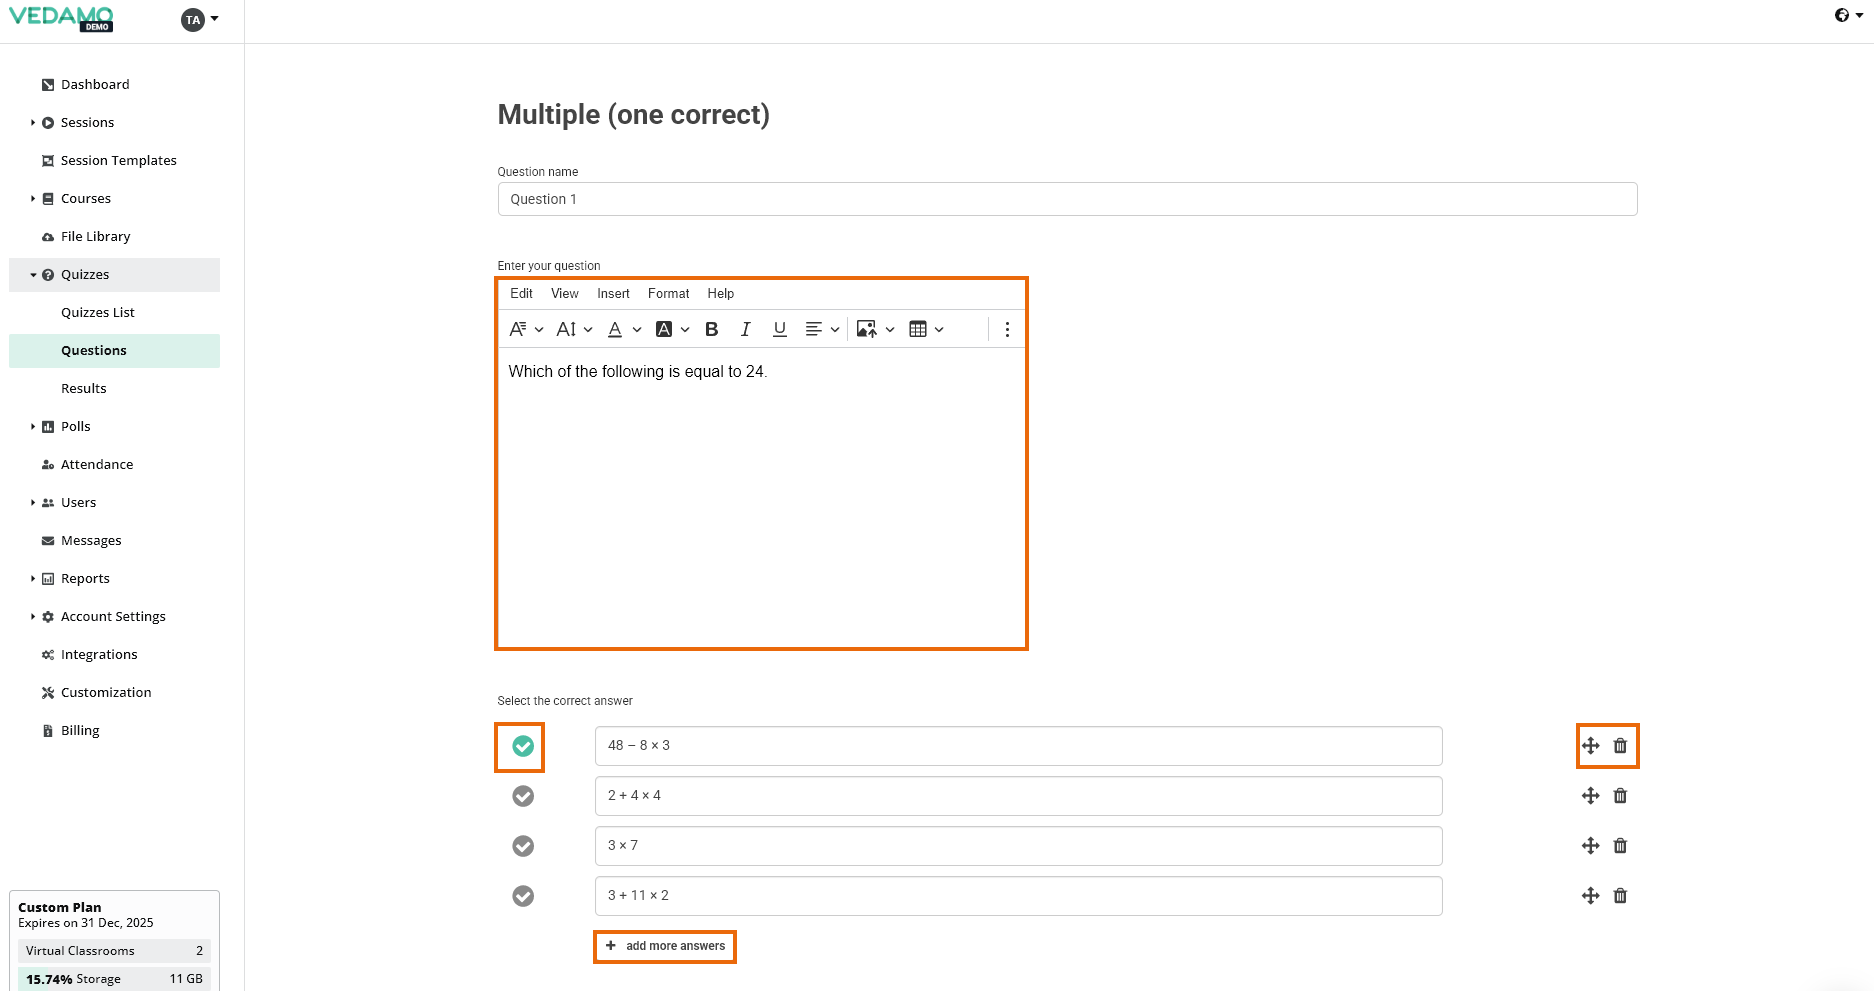
To create a multiple-choice question with one correct answer, select the first option and click Create.
First, enter your question, then add the possible answers.
Select the correct answer by clicking on the checkmark. It will turn green (By default the first answer is the correct one).
When you hover over an answer, two additional options appear: to move it if you need to reorder the answers or to delete it.
You may add as many answers as you want.
There is a field for tutor feedback for an explanation of the question and the correct answer.
Note: The tutor’s feedback field will be visible to the students after the completion of the quiz.
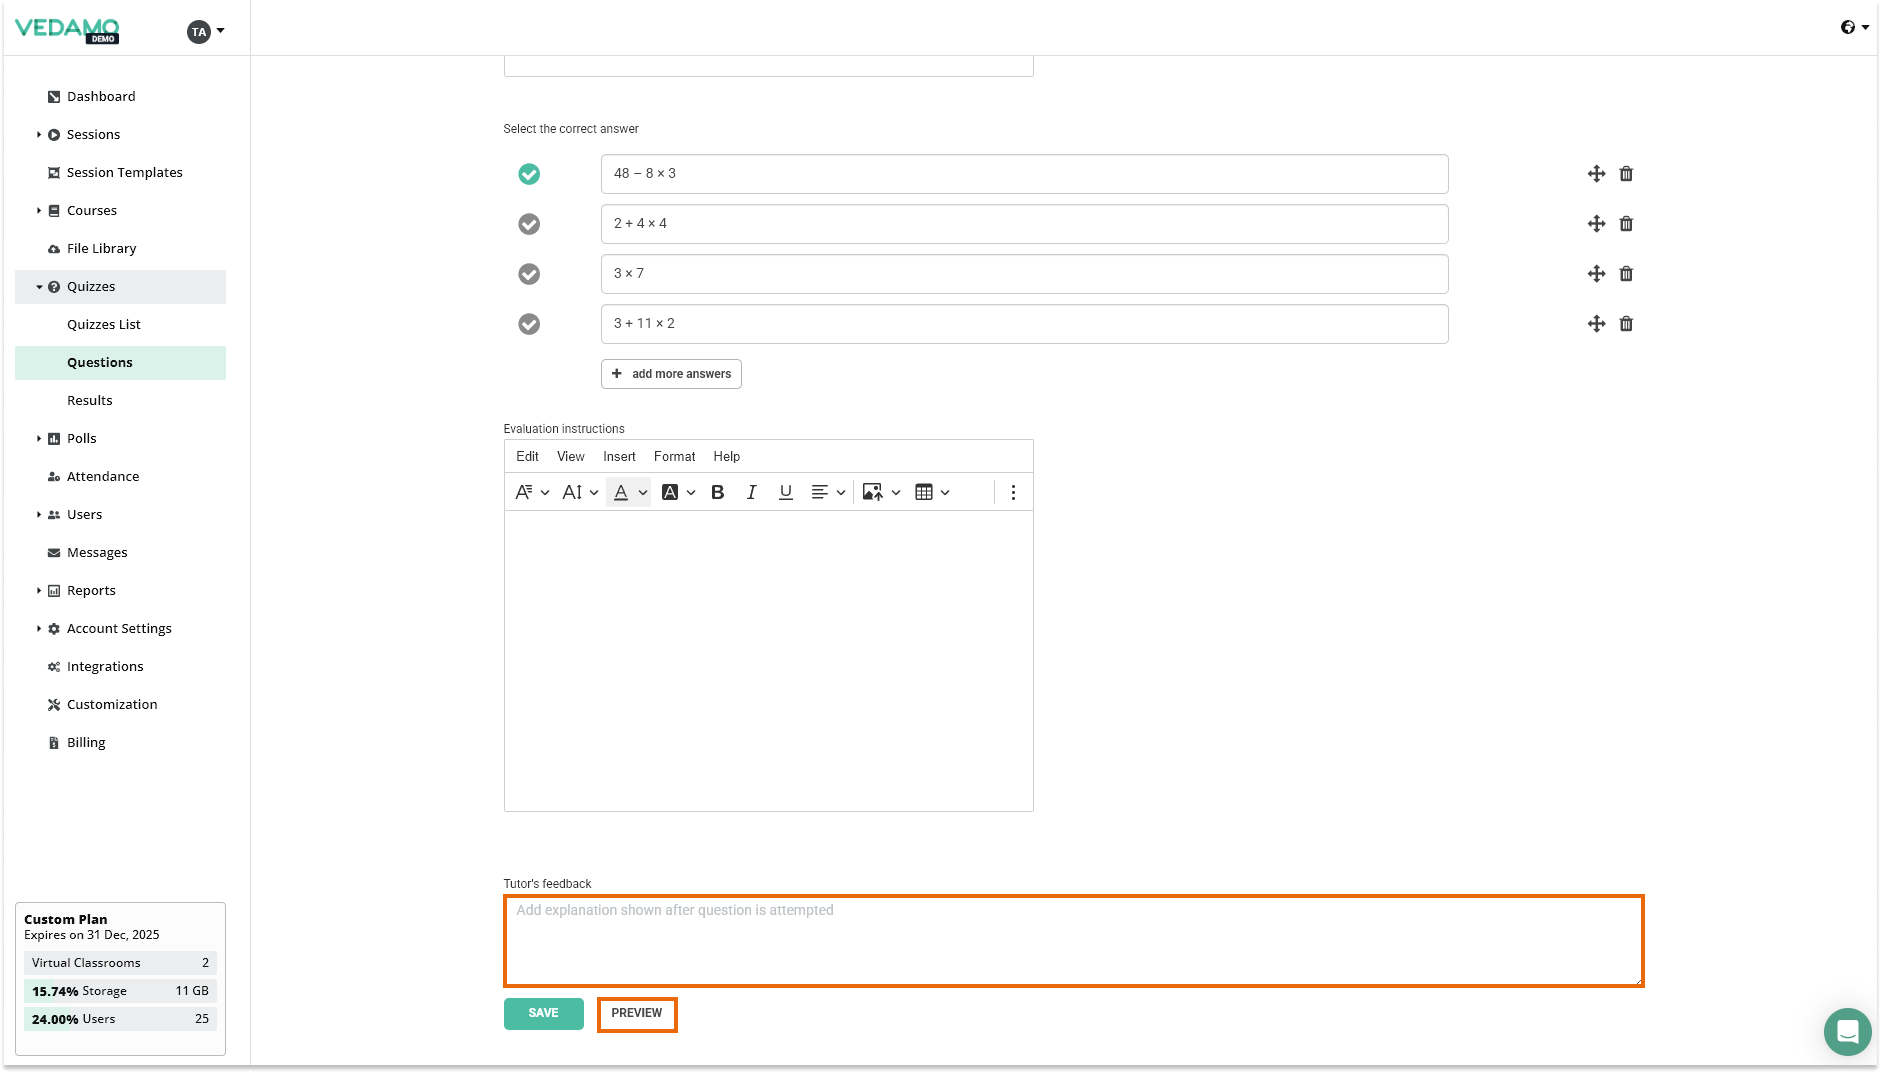
Before saving the question you can click on PREVIEW to see how it looks. To close the window press the X button or close.
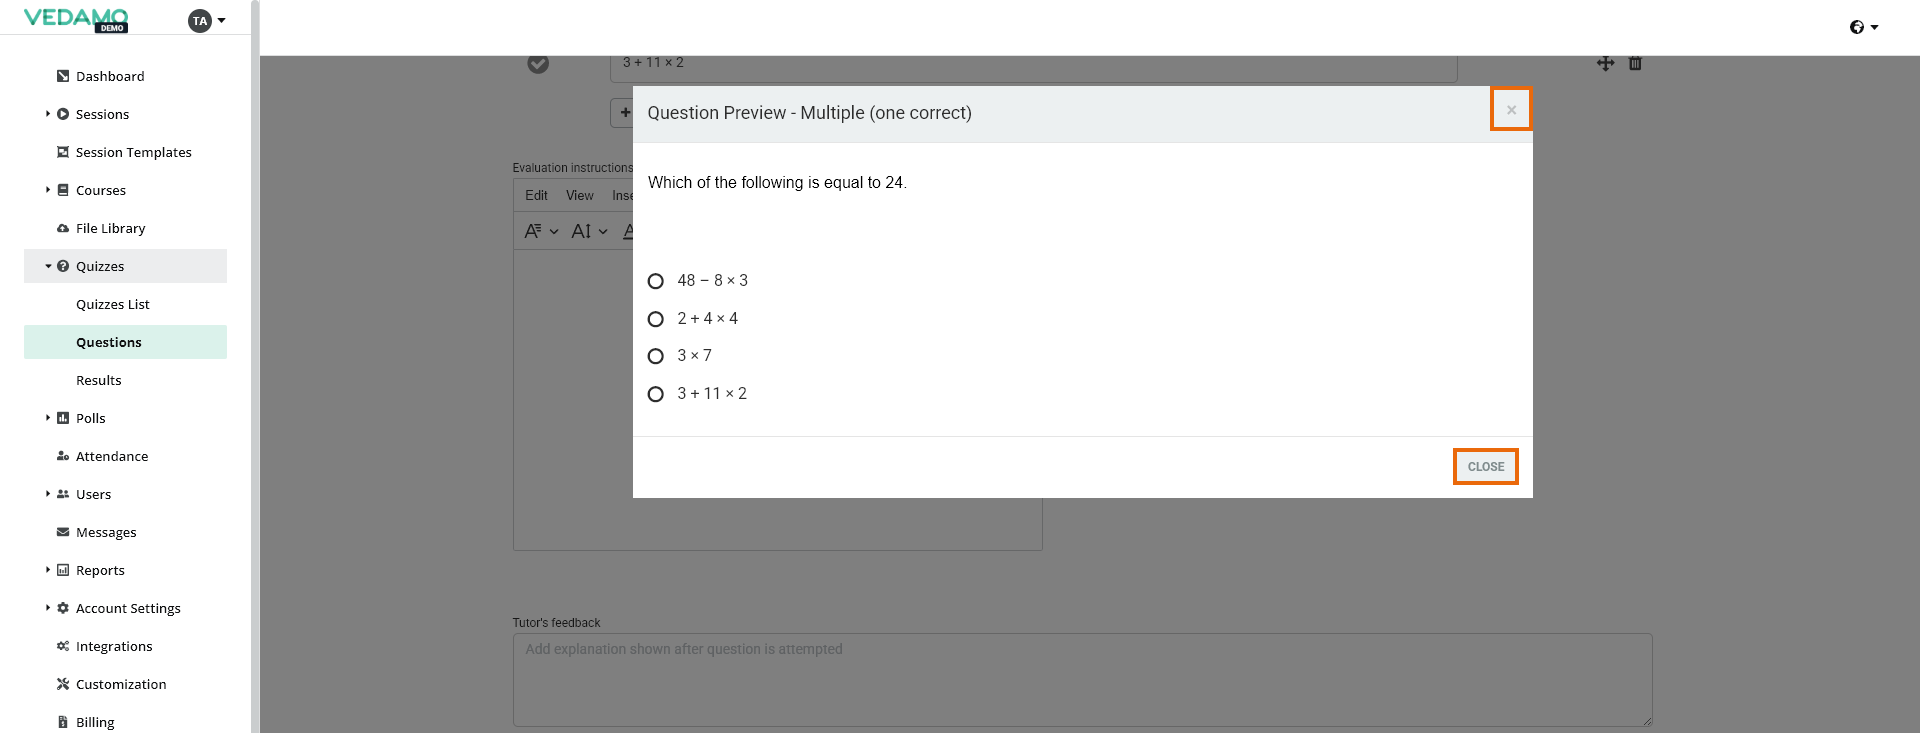
When you are ready with your question, click on SAVE + RETURN TO QUIZ.
Multiple (more than one)
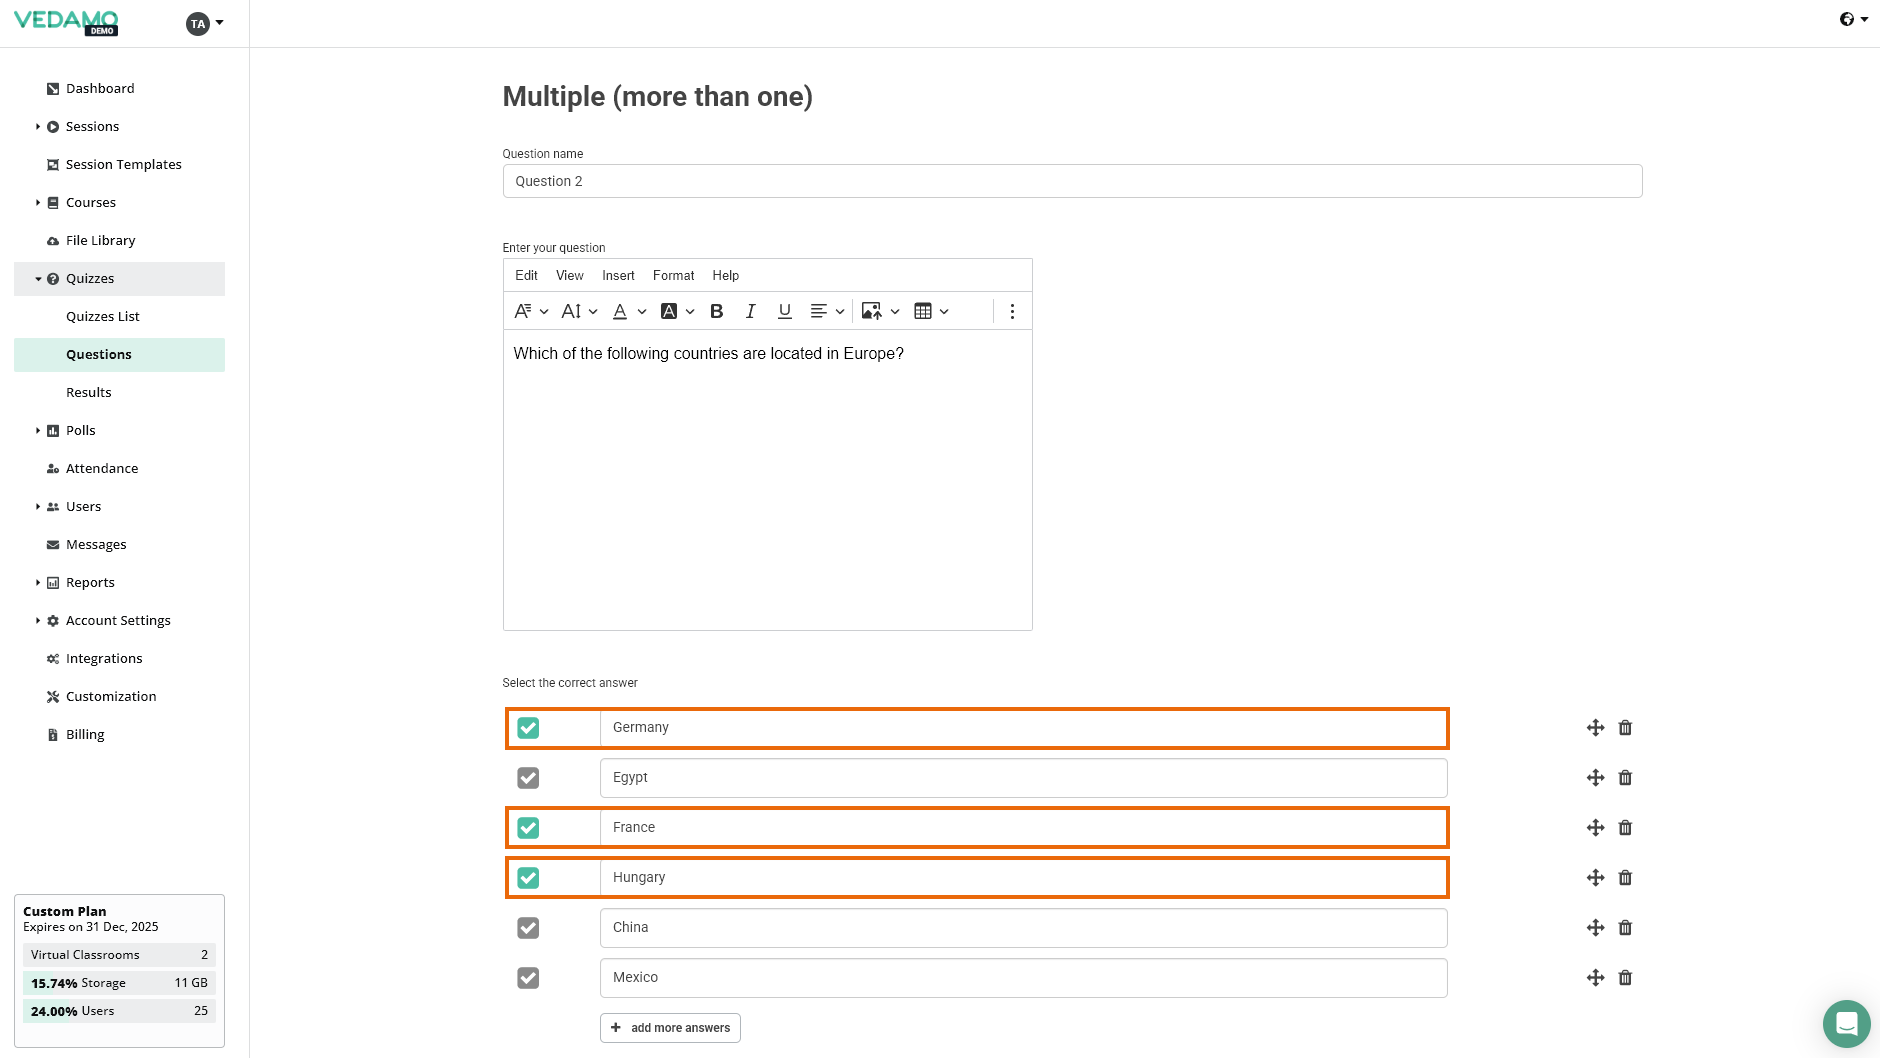
The second type of question is multiple choice with more than one correct answer. The creation process is the same as the first type; the only difference is that you can select multiple correct answers. After you are done, press Save in order to save your progress.
Free Text
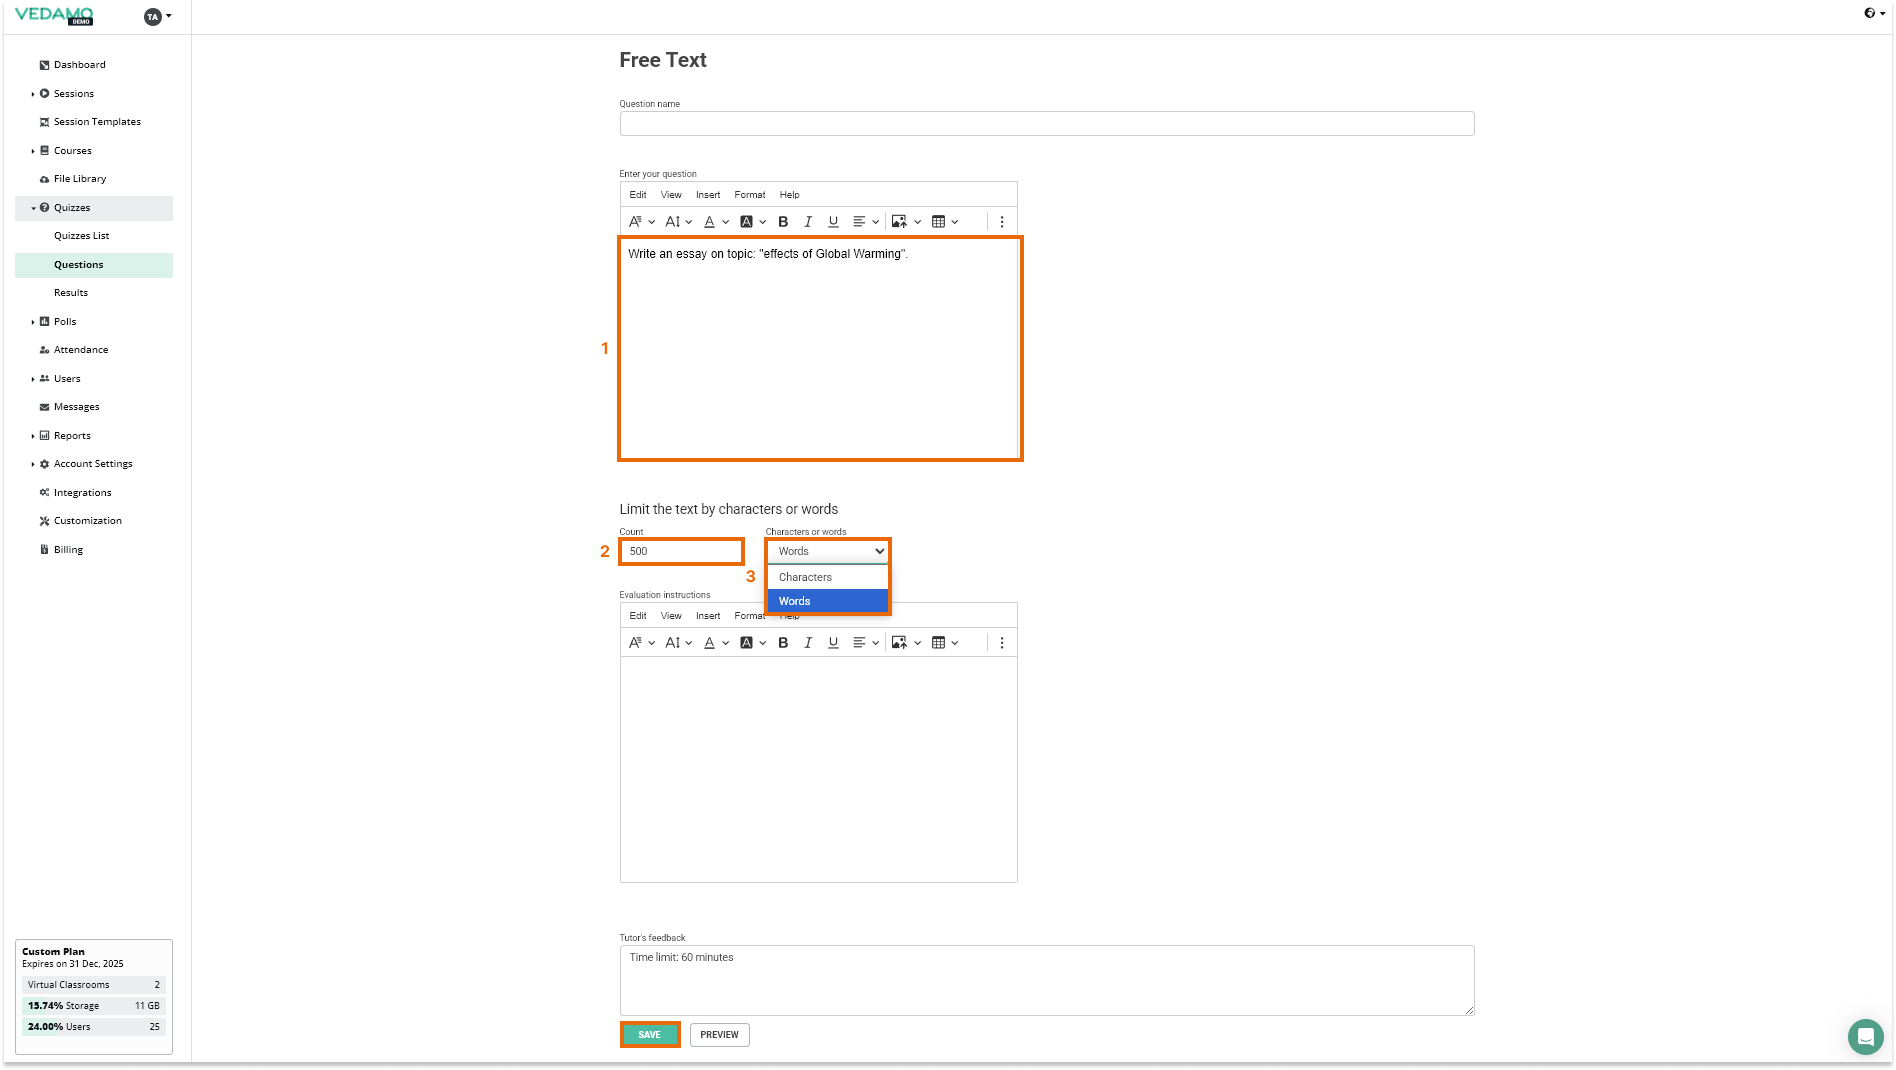
This is for essays or for any other type of writing assignment.
Enter instructions in the text box. Then, you can choose to set a character or word limit for the text that the students need to write. Once again, there is an option to add an explanation. Then you may preview and save the question – click on SAVE.
Fill in the blanks
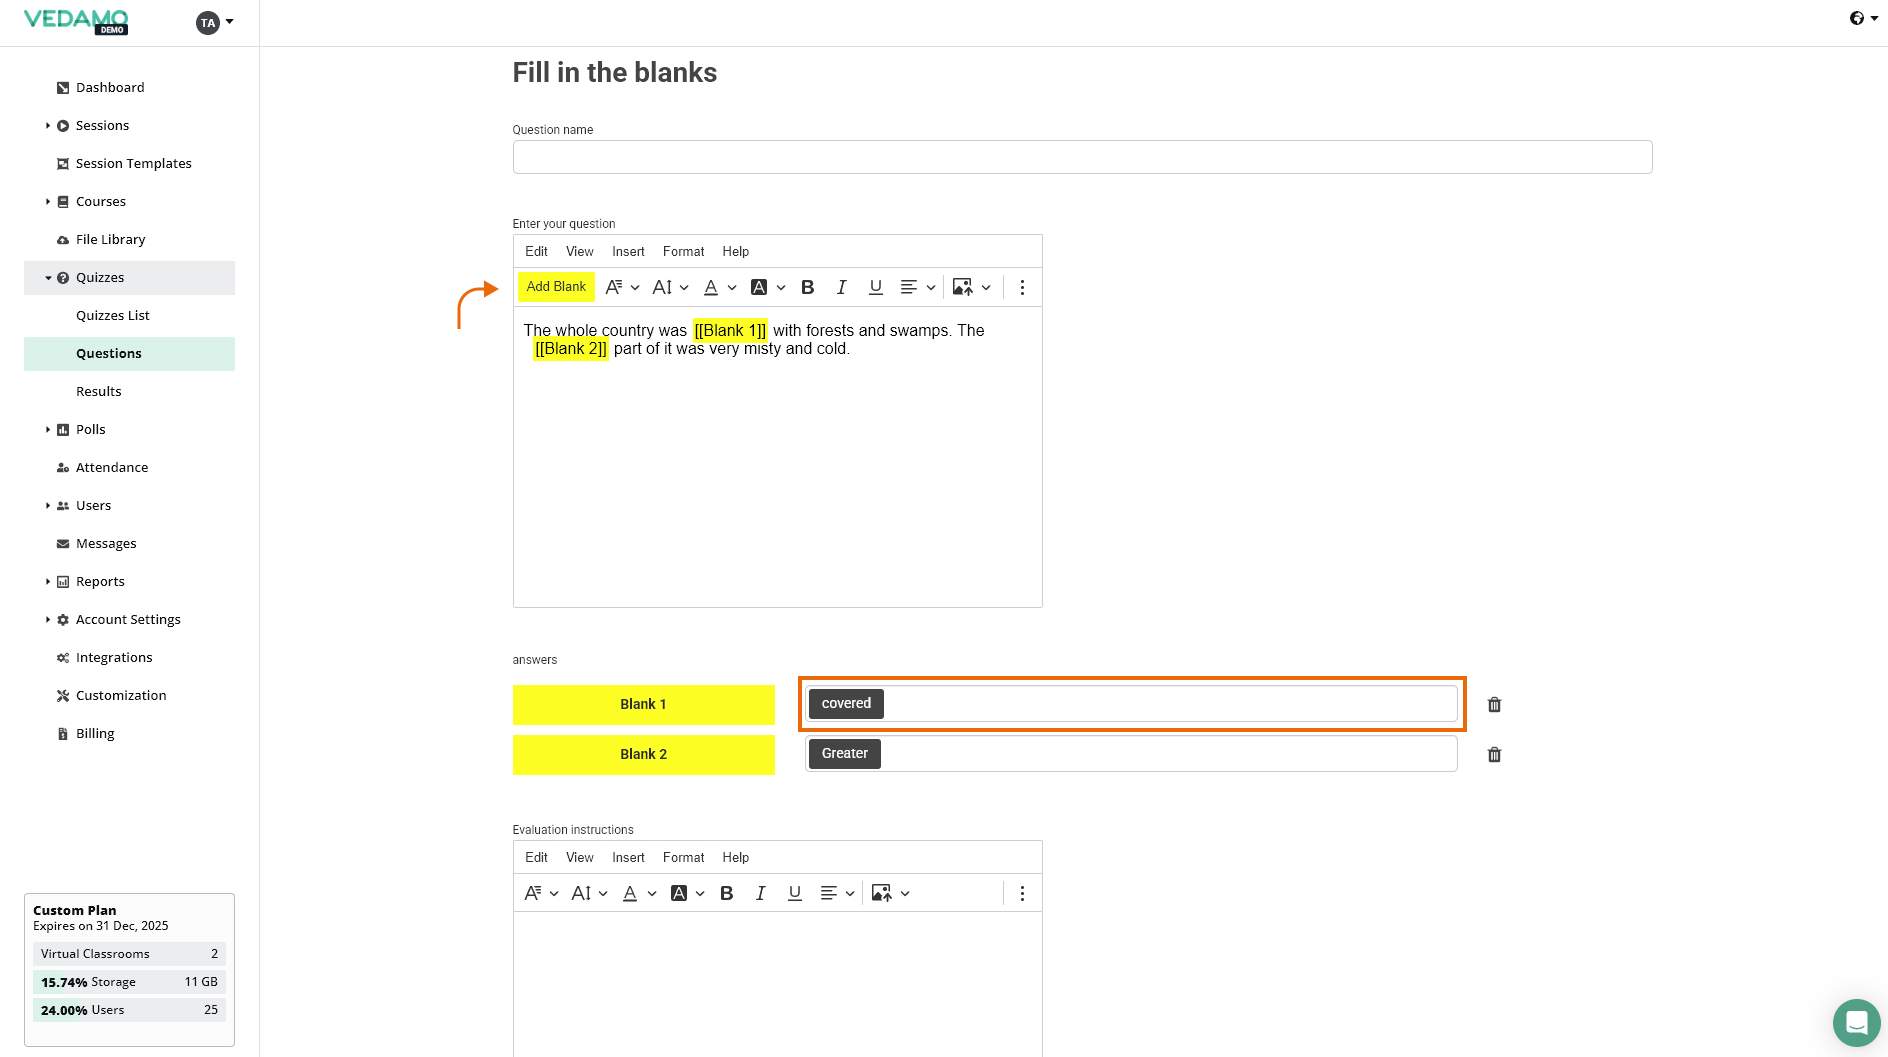
Here, students have to write in the missing words.
The blanks are shown in yellow. You can add blanks while typing the text – you just need to click on the yellow Add Blank button in the top right corner of the text box.
Or you can paste your text and then decide which words you want to omit – select the word and click on the yellow Add Blank button.
Then you need to type in the correct answers. You can also add an explanation.
Finally, preview and save your questions by clicking on SAVE + RETURN TO QUIZ.
Match the blanks
Students have to drag and drop or choose an item from a dropdown menu in order to complete sentences or a text with words or terms.
You need to enter your questions first. You can add blanks while typing the text – you just need to click on the yellow Add Blank button in the top right corner of the text box.
Or you can paste your text and then decide which words you want to omit – select the word and click on the yellow Add Blank button.
Then provide the correct answers. You can also add some incorrect answers to make the questions more challenging.
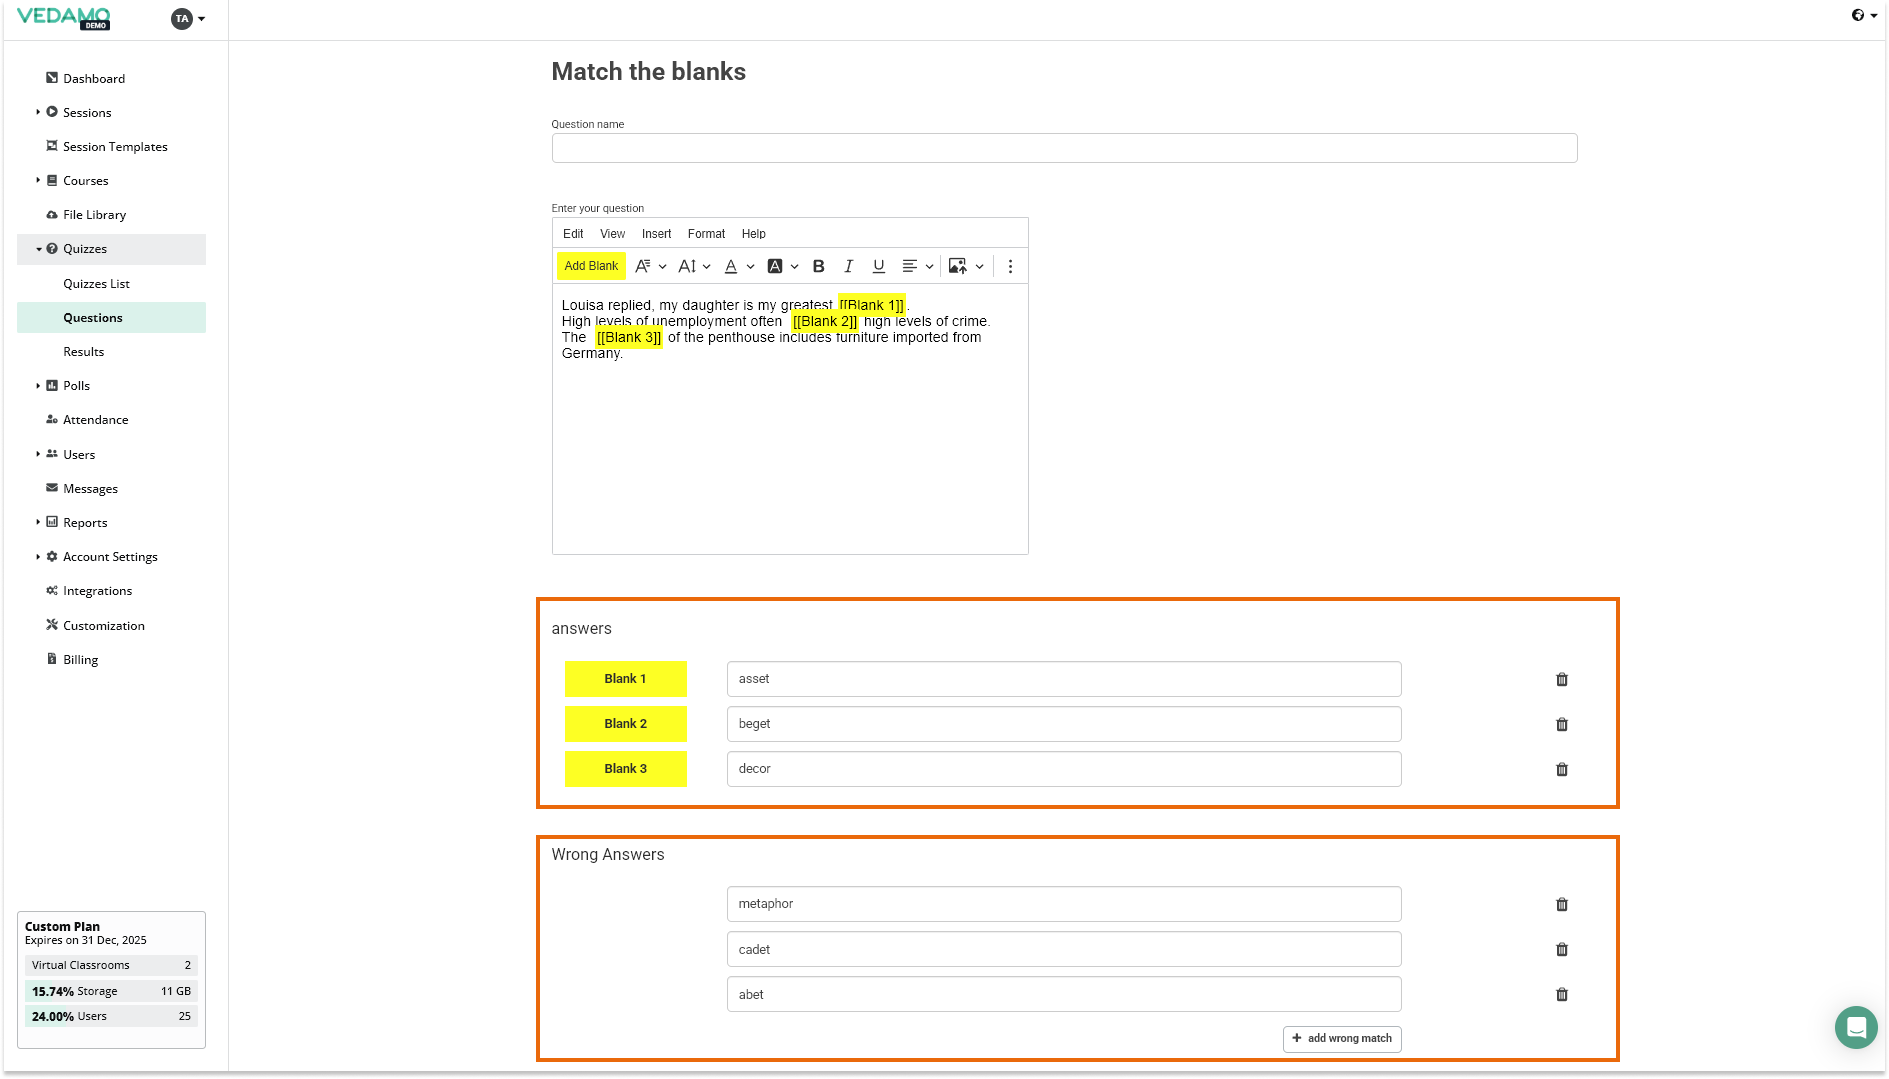
Then you have the option to select the preview mode of the questions.

Finally, you can add an explanation. When you are finished, click on SAVE.
Matching
The last type of question is Matching where the students have to pair items in one column with items from another column.
First, enter the instructions for the students.
Then, write the options and the corresponding correct answers.
You can also add some incorrect answers to make the task more challenging.
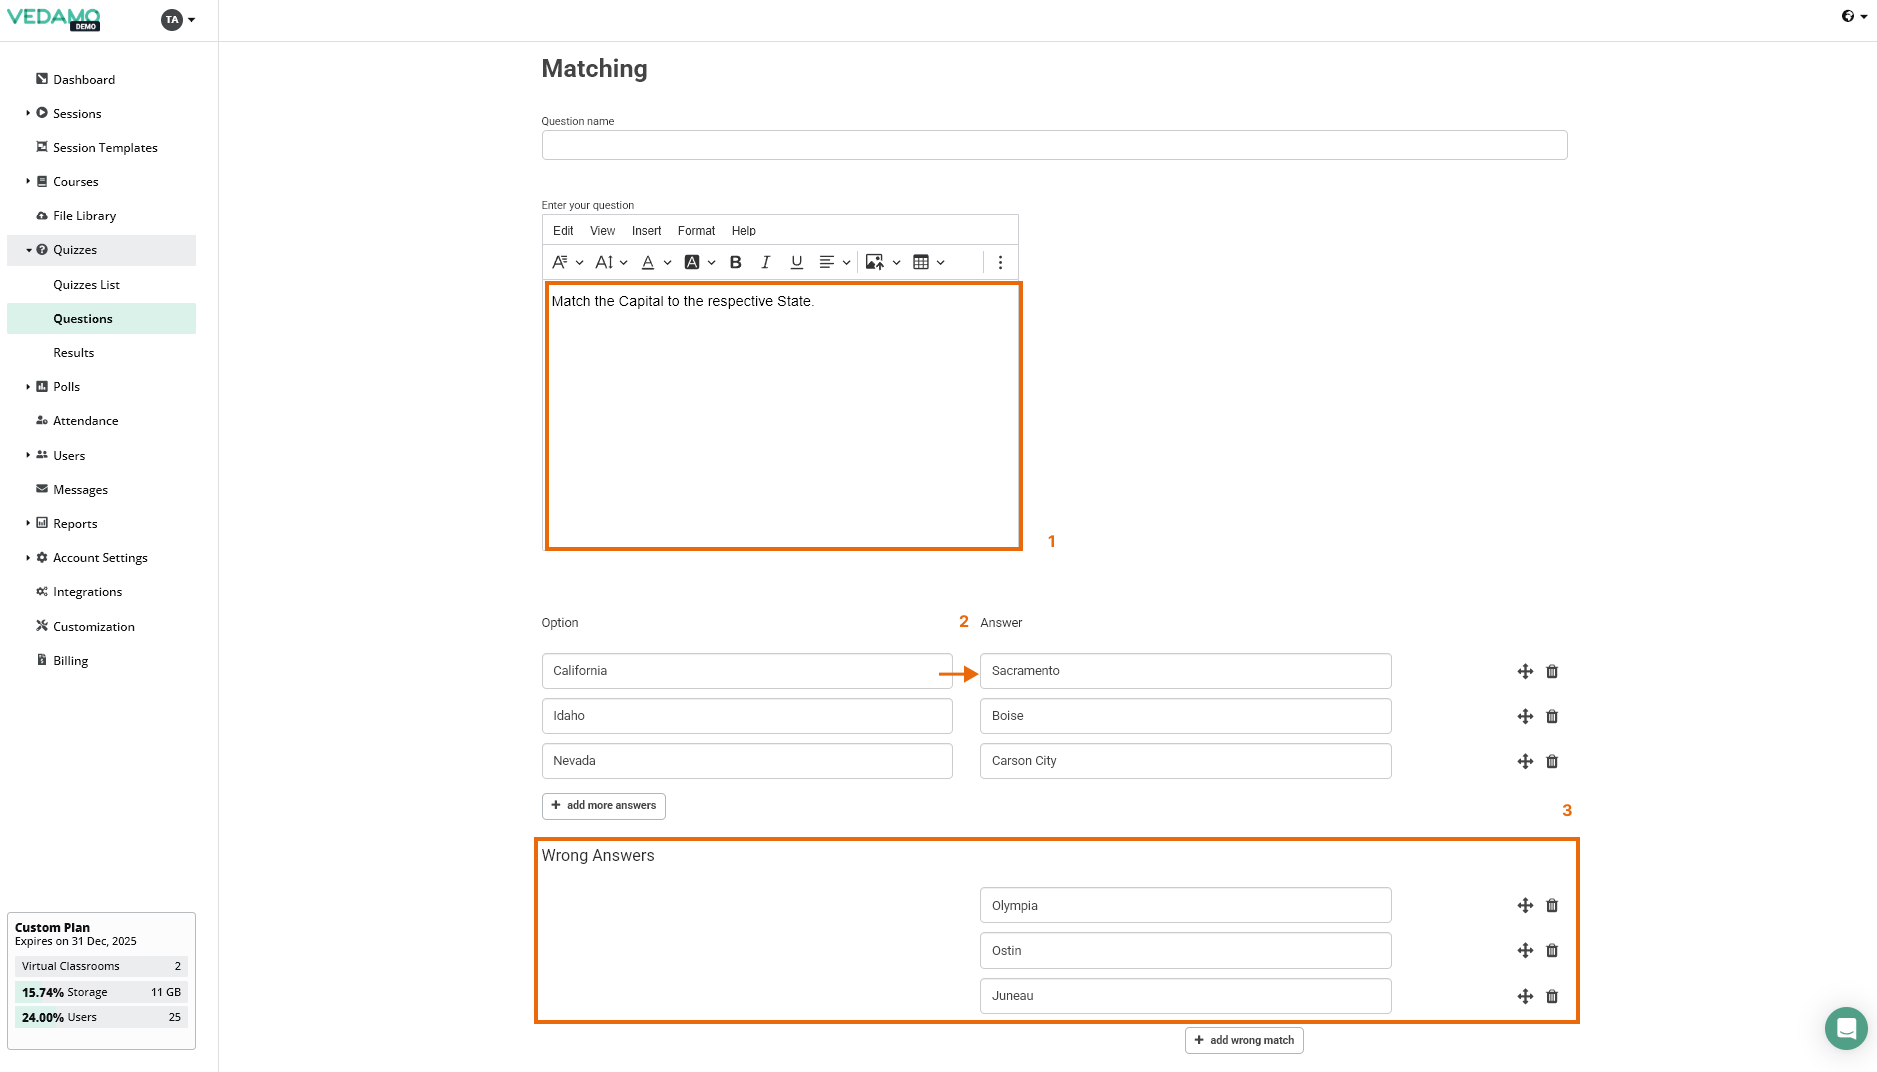
Then, you can select to have it in a drag and drop format or in a dropdown option. Use the preview option to see the difference.

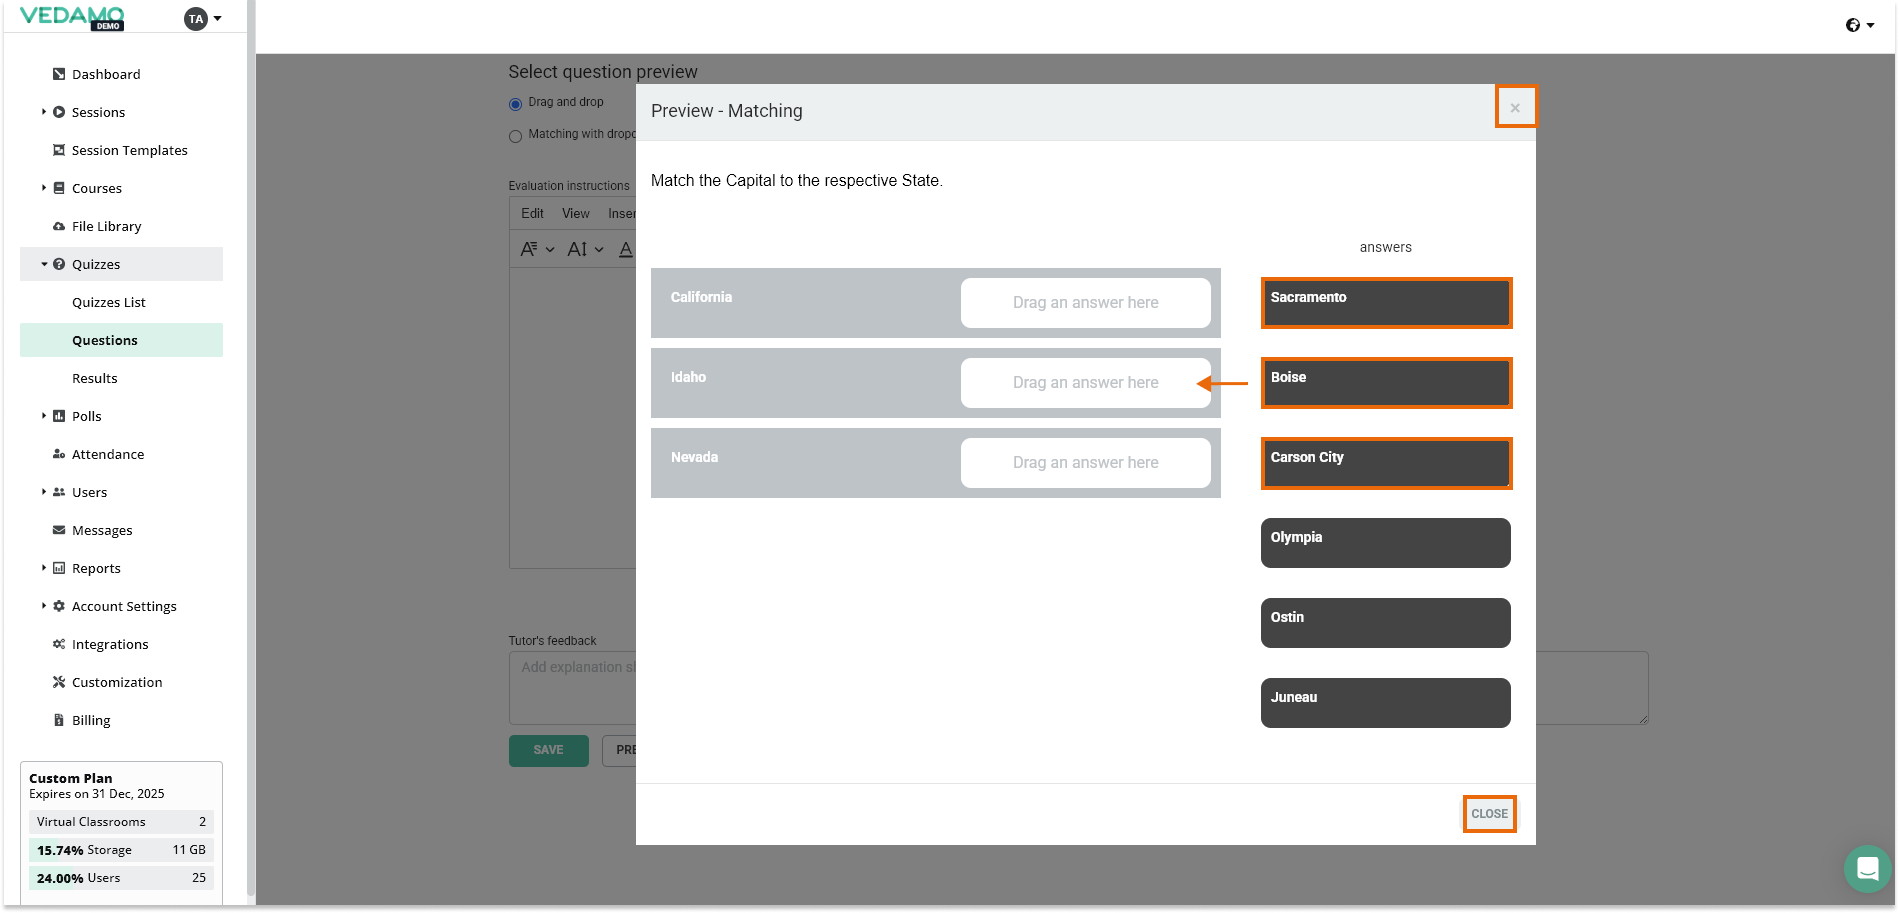
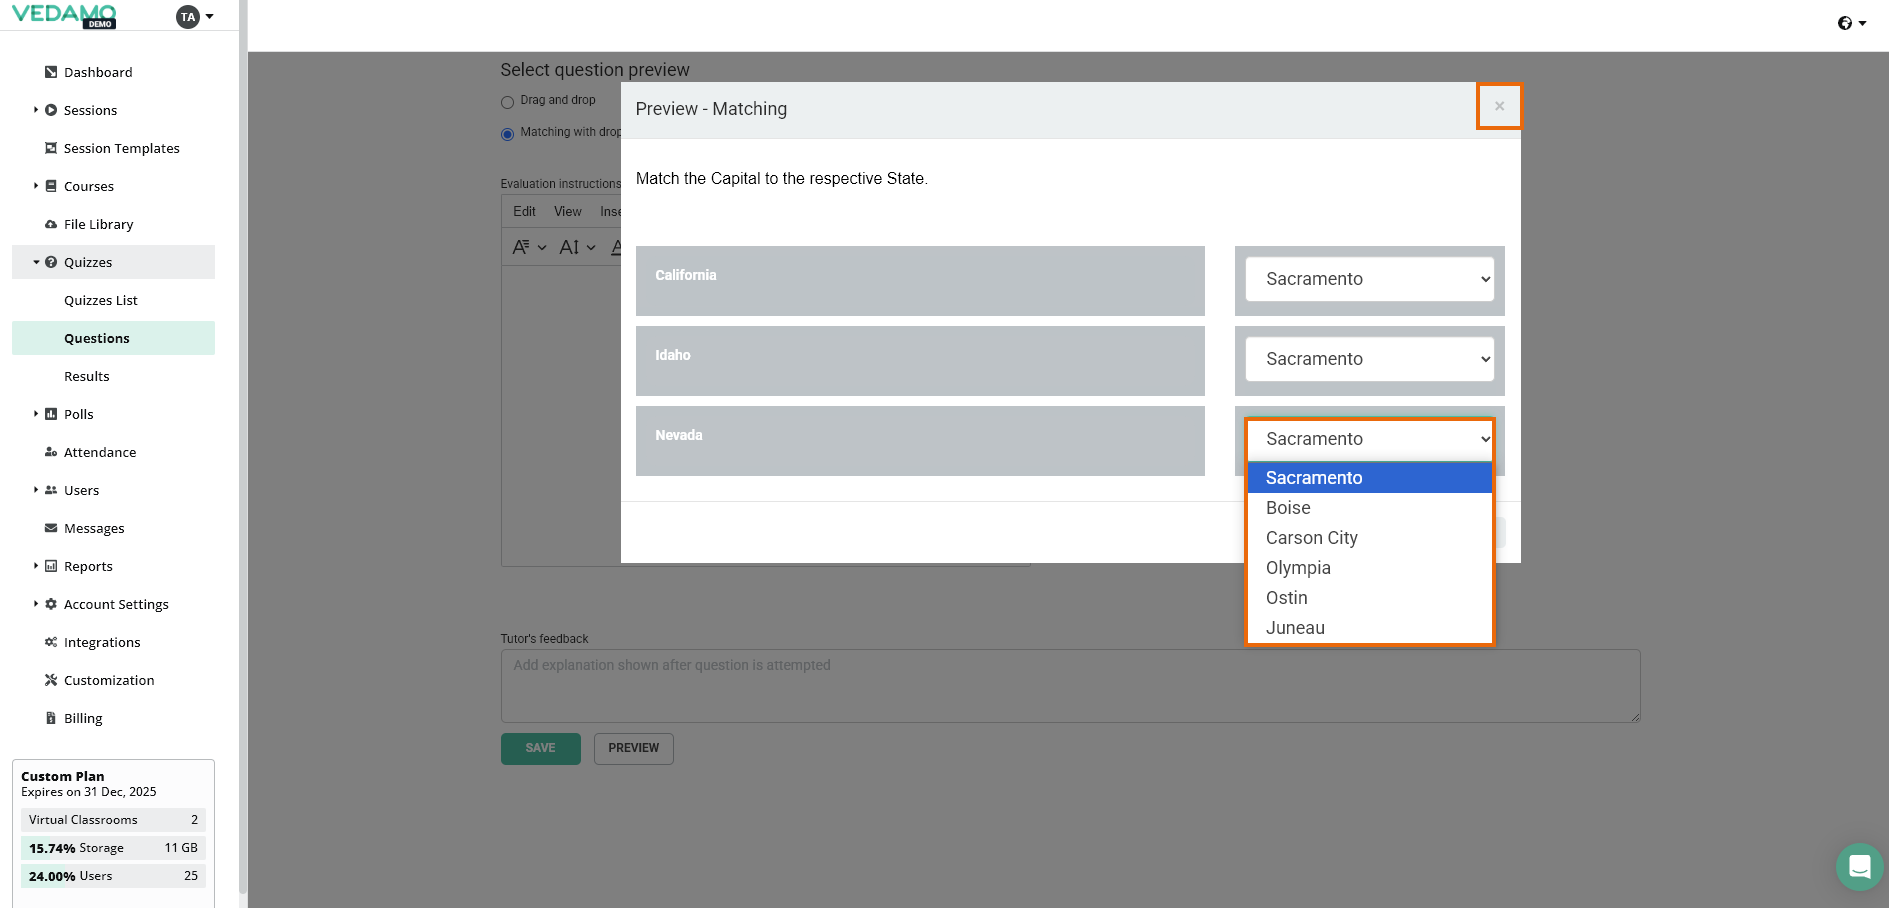
Finally, you can add an explanation. When you are finished, click on SAVE + RETURN TO QUIZ.
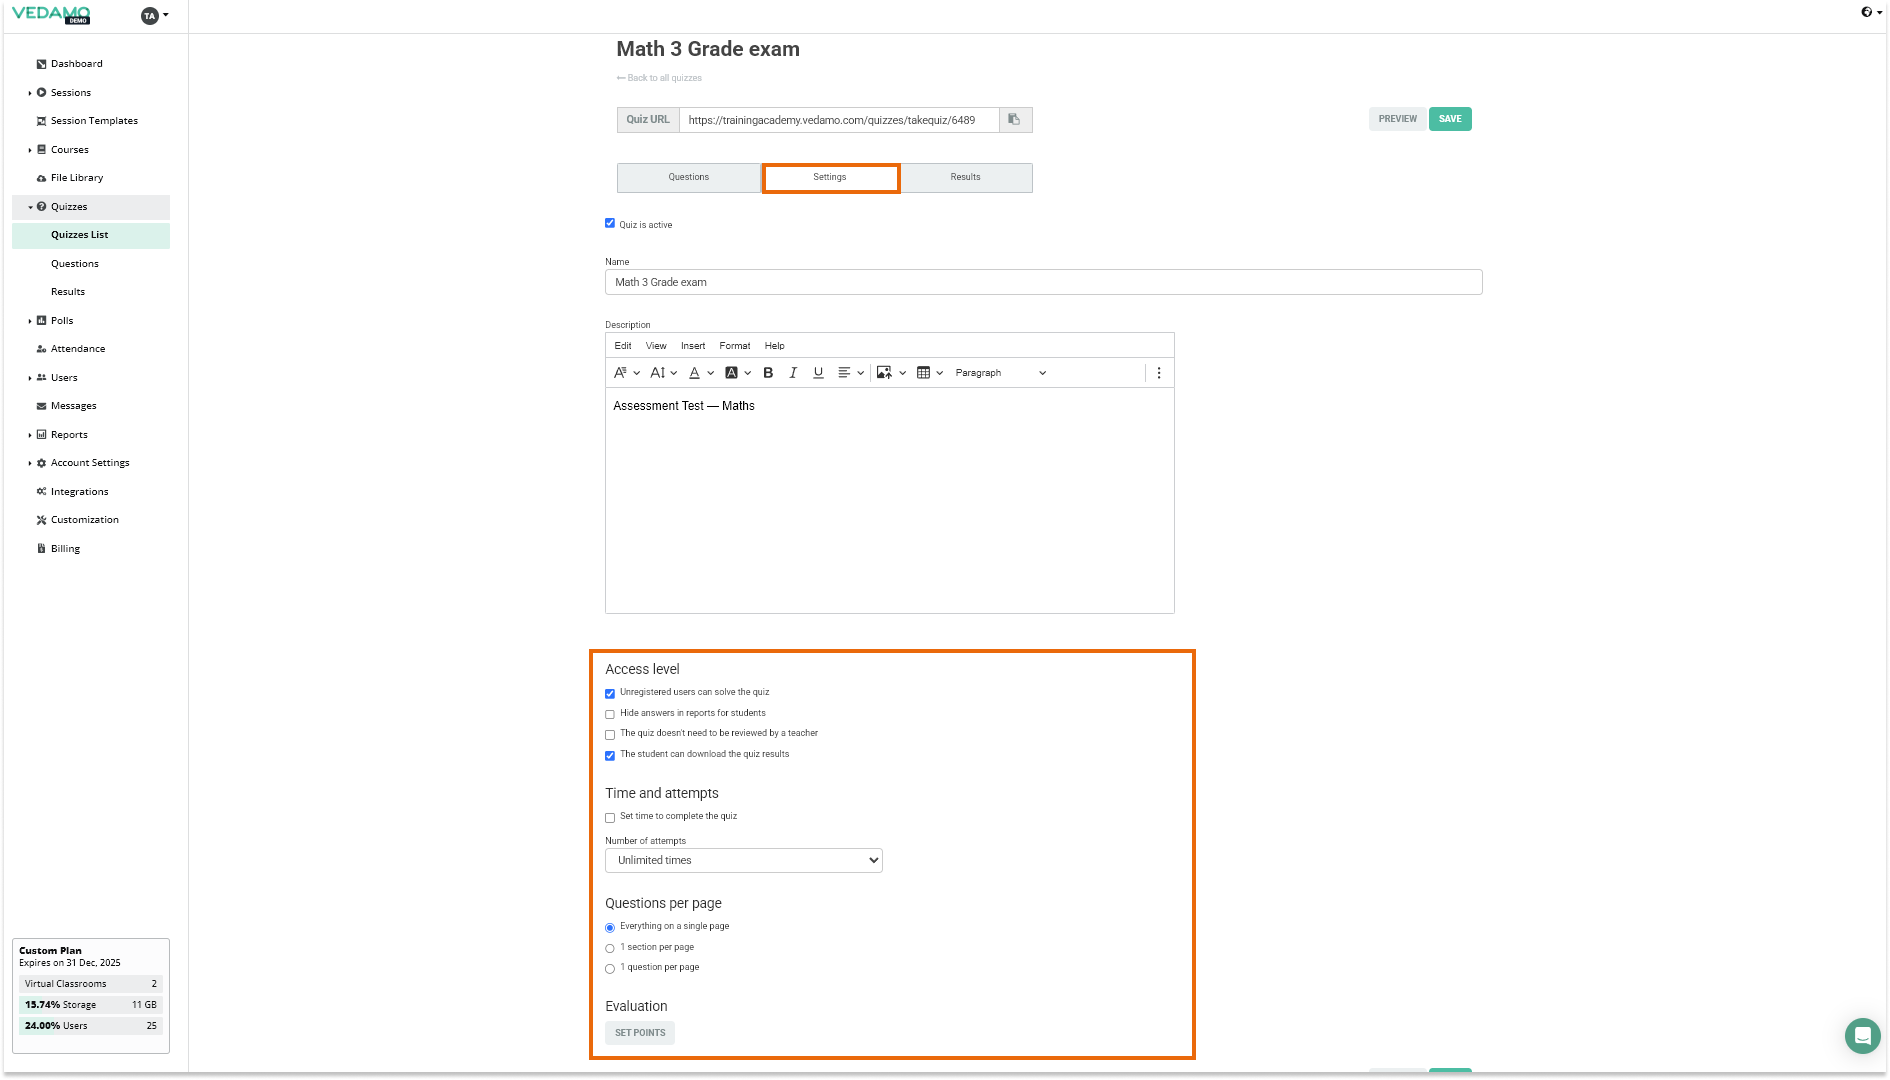
QUIZ SETTINGS
Under the Settings tab you have the following options:
- Unregistered users can solve the quiz – Allow the quiz to be taken by unregistered users (guests users outside your academy)
- Hide answers in the reports for students – No answers will be shown in the student’s reports
- The quiz doesn’t need to be reviewed by a teacher – Allow the LMS to autocomplete the review of each quiz
- Set the time and number of attempts allowed for each quiz
- Determine how many questions per page/section the quiz will have
- Set a custom evaluation
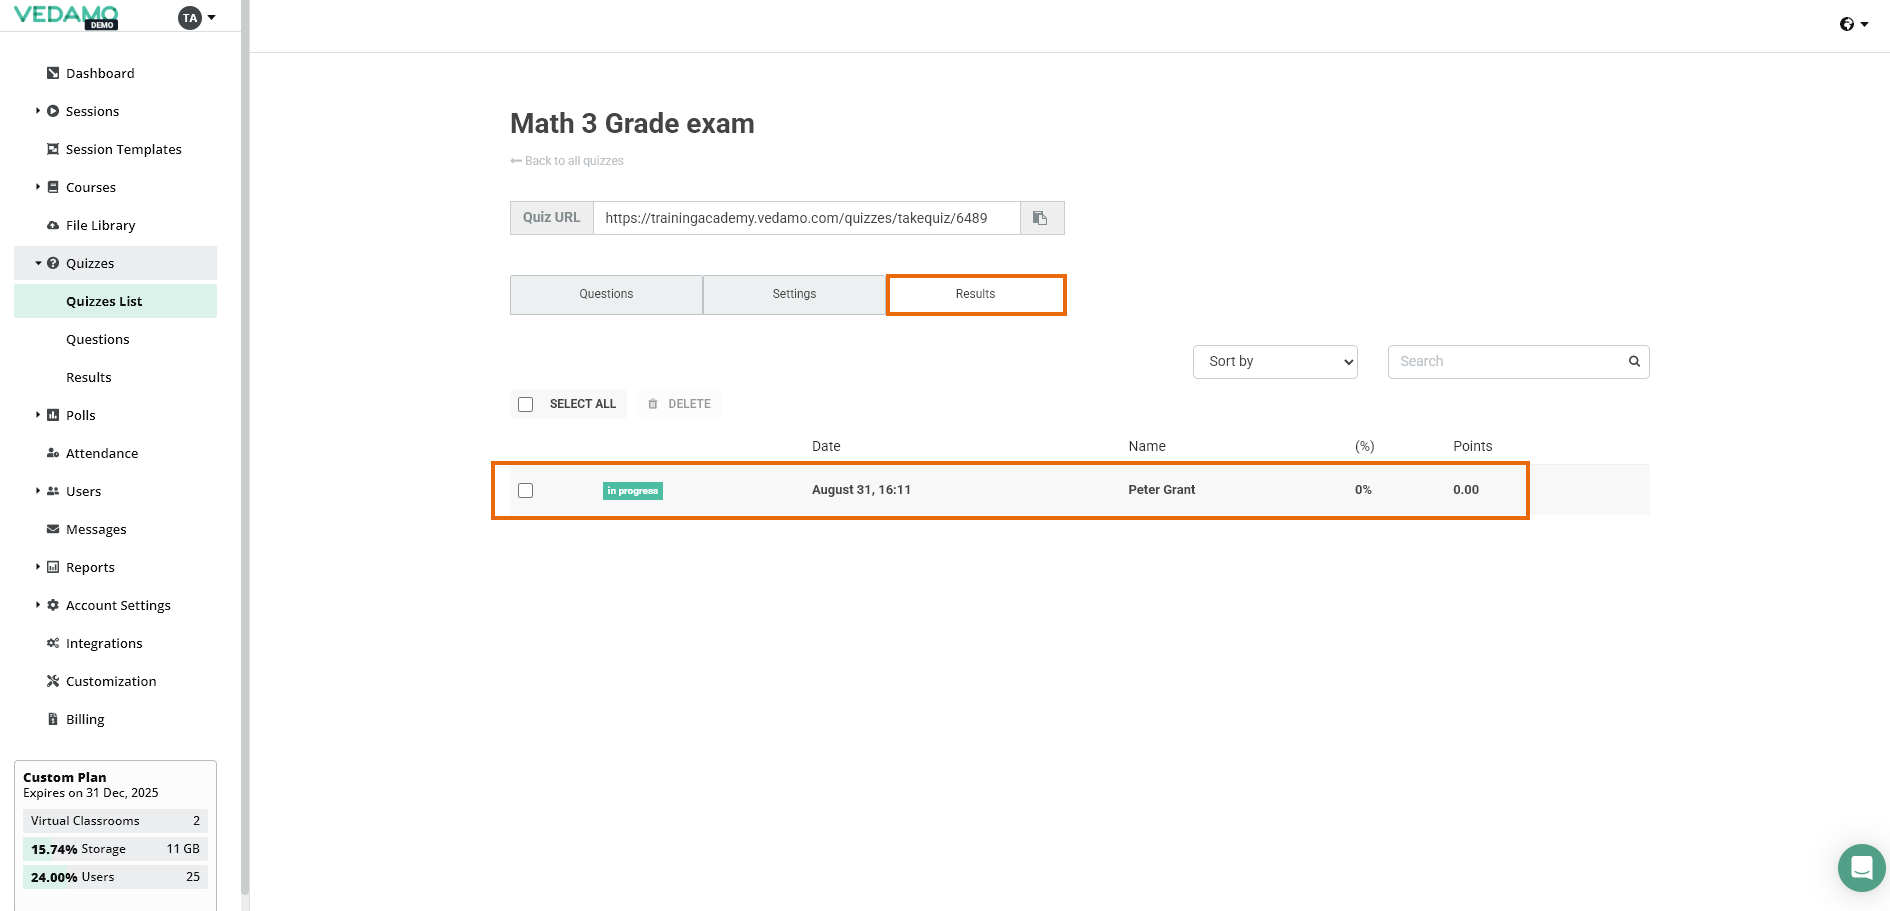
In the Results tab you can find all the results of the quizzes that have been completed in the academy. There are several different statuses for the quiz results:
- in progress – the quiz has not been done (submited) by the student
- pending – the quiz has been submitted and awaits to be reviewed by the teacher
- reviewed – the quiz has been reviewed by the teacher via the complete review button.
